八、JavaScript的事件处理
# 1、认识事件(Event)
Web页面需要经常和用户之间进行交互,而交互的过程中我们可能想要捕捉这个交互的过程:
- 比如用户点击了某个按钮、用户在输入框里面输入了某个文本、用户鼠标经过了某个位置;
- 浏览器需要搭建一条JavaScript代码和事件之间的桥梁;
- 当某个事件发生时,让JavaScript可以相应(执行某个函数),所以我们需要针对事件编写处理程序(handler);
如何进行事件监听呢?
- 事件监听方式一:在script中直接监听(很少使用);
- 事件监听方式二:DOM属性,通过元素的on来监听事件;
- 事件监听方式三:通过EventTarget中的addEventListener来监听;
<div id="box" onclick="alert('事件监听方式一-box')">我是box</div>
<script>
  box.onclick = function () {//会把事件监听方式一 的onclick覆盖掉
    alert('事件监听方式二-box')
  }
  box.addEventListener('click',function() {
    console.log('事件监听方式三-box')
  })
</script>
2
3
4
5
6
7
8
9
# 2、常见的事件列表
鼠标事件:
- click —— 当鼠标点击一个元素时(触摸屏设备会在点击时生成)。
- mouseover / mouseout —— 当鼠标指针移入/离开一个元素时。
- mousedown / mouseup —— 当在元素上按下/释放鼠标按钮时。
- mousemove —— 当鼠标移动时。
键盘事件:
- keydown 和 keyup —— 当按下和松开一个按键时。
表单(form)元素事件:
- submit —— 当访问者提交了一个
<form>时。 - focus —— 当访问者聚焦于一个元素时,例如聚焦于一个
<input>。
- submit —— 当访问者提交了一个
Document 事件:
- DOMContentLoaded —— 当 HTML 的加载和处理均完成,DOM 被完全构建完成时。
CSS 事件:
- transitionend —— 当一个 CSS 动画完成时。
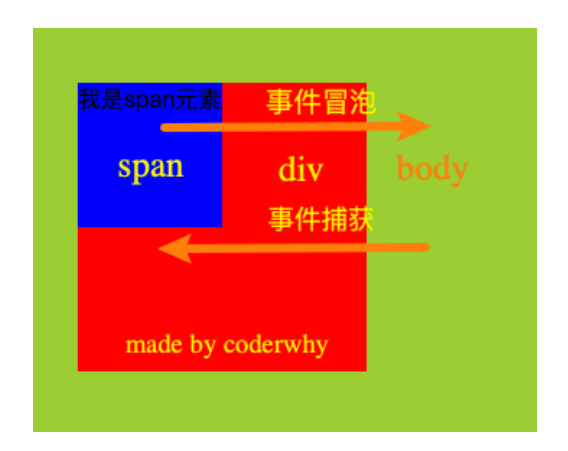
# 3、认识事件流
- 事实上对于事件有一个概念叫做事件流,为什么会产生事件流呢?
- 我们可以想到一个问题:当我们在浏览器上对着一个元素点击时,你点击的不仅仅是这个元素本身;
- 这是因为我们的HTML元素是存在父子元素叠加层级的;
- 比如一个span元素是放在div元素上的,div元素是放在body元素上的,body元素是放在html元素上的;然后你点击span元素就会发生 事件捕获->目标元素->事件冒泡 的事件流
<html>
<body>
  <div class="box">
    <span class="word">哈哈哈</span>
  </div>
  <script>
    var htmlEl = document.documentElement
    var bodyEl = document.body
    var boxEl = document.querySelector('.box')
    var wordEl = document.querySelector('.word')
    htmlEl.addEventListener('click',function() {
      console.log('html事件触发')
    })
    bodyEl.addEventListener('click',function() {
      console.log('body事件触发')
    })
    boxEl.addEventListener('click',function() {
      console.log('div.box事件触发')
    })
    wordEl.addEventListener('click',function() {
      console.log('span.word事件触发')
    })

// 具体执行打印:(默认事件冒泡))
// > span.word事件触发
// > div.box事件触发
// > body事件触发
// > html事件触发
  </script>
</body>
</html>
2
3
4
5
6
7
8
9
10
11
12
13
14
15
16
17
18
19
20
21
22
23
24
25
26
27
28
29
30
31
# 4、事件冒泡和事件捕获
我们会发现(上面代码案例)默认情况下事件是从最内层的span向外依次传递的顺序,这个顺序我们称之为事件冒泡(Event Bubble);
事实上,还有另外一种监听事件流的方式就是从外层到内层(body -> span),这种称之为事件捕获(Event Capture);
为什么会产生两种不同的处理流呢?
- 这是因为早期浏览器开发时,不管是IE还是Netscape公司都发现了这个问题;
- 但是他们采用了完全相反的事件流来对事件进行了传递;
- IE采用了事件冒泡的方式,Netscape采用了事件捕获的方式;
那么我们如何去监听事件捕获的过程呢?
- target.addEventListener(type, listener, options); 只要将addEventListener的第三个参数(默认值为:false->事件冒泡)改为true即可监听事件捕获
<html>
<body>
  <div class="box">
    <span class="word">哈哈哈</span>
  </div>
  <script>
    var htmlEl = document.documentElement
    var bodyEl = document.body
    var boxEl = document.querySelector('.box')
    var wordEl = document.querySelector('.word')
    htmlEl.addEventListener('click',function() {
      console.log('html事件触发')
    },true)
    bodyEl.addEventListener('click',function() {
      console.log('body事件触发')
    },true)
    boxEl.addEventListener('click',function() {
      console.log('div.box事件触发')
    },true)
    wordEl.addEventListener('click',function() {
      console.log('span.word事件触发')
    },true)

// 具体执行打印:(事件捕获))
// > html事件触发
// > body事件触发
// > div.box事件触发
// > span.word事件触发
  </script>
</body>
</html>
2
3
4
5
6
7
8
9
10
11
12
13
14
15
16
17
18
19
20
21
22
23
24
25
26
27
28
29
30
31
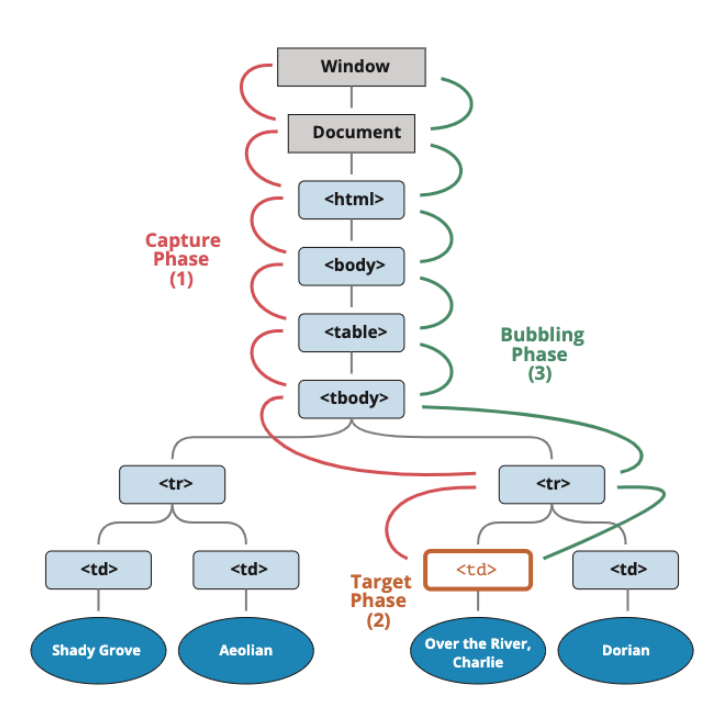
# 5、事件捕获和冒泡的过程
如果我们都监听,那么会按照如下顺序来执行:
捕获阶段(Capturing phase): 事件(从 Window)向下走近元素。
目标阶段(Target phase): 事件到达目标元素。
冒泡阶段(Bubbling phase): 事件从元素上开始冒泡。
事实上,我们可以通过event对象来获取当前的阶段:event.eventPhase eventPhase (opens new window)
开发中通常会使用事件冒泡,所以事件捕获了解即可。
# 6、事件对象
当一个事件发生时,就会有和这个事件相关的很多信息:
- 比如事件的类型是什么,你点击的是哪一个元素,点击的位置是哪里等等相关的信息;
- 那么这些信息会被封装到一个Event对象中,这个对象由浏览器创建,称之为event对象;
- 该对象给我们提供了想要的一些属性,以及可以通过该对象进行某些操作;
如何获取这个event对象呢?
- event对象会在传入的事件处理(event handler)函数回调时,被系统传入;
- 我们可以在回调函数中拿到这个event对象;
<span>我是span元素</span>
<script>
  var spanEl = document.querySelector('span')
  spanEl.addEventListener('click',function(event) {
    console.log('事件对象:',event)
  })
</script>
2
3
4
5
6
7
- 这个对象中都有哪些常见的属性和操作呢?
# 7、event常见的属性和方法
常见的属性:
- type:事件的类型;
- target:当前事件发生的元素;
- currentTarget:当前处理事件的元素;
- eventPhase:事件所处的阶段;
- offsetX、offsetY:事件发生在元素内的位置;
- clientX、clientY:事件发生在客户端内的位置;
- pageX、pageY:事件发生在客户端相对于document的位置;
- screenX、screenY:事件发生相对于屏幕的位置;
常见的方法:
- preventDefault:取消事件的默认行为;
- stopPropagation:阻止事件的进一步传递(冒泡或者捕获都可以阻止);
事件处理中的this
在函数中,我们也可以通过this来获取当前的发生元素:
这是因为在浏览器内部,调用event handler是绑定到当前的target上的
<span>我是span元素</span>
<script>
  var spanEl = document.querySelector('span')
  spanEl.addEventListener('click',function(event) {
    console.log(this === event.target)//true
  })
</script>
2
3
4
5
6
7
# 8、EventTarget类
我们会发现,所有的节点、元素都继承自EventTarget
- 事实上Window也继承自EventTarget;

- 事实上Window也继承自EventTarget;
那么这个EventTarget是什么呢?
- EventTarget是一个DOM接口,主要用于添加、删除、派发Event事件;
EventTarget常见的方法:
- addEventListener:注册某个事件类型以及事件处理函数;
- removeEventListener:移除某个事件类型以及事件处理函数;
- dispatchEvent:派发某个事件类型到EventTarget上;
<body>
  <div class="box">我是box</div>
  <script>
    var boxEl = document.querySelector('.box')

    boxEl.addEventListener('click',function(event) {
        console.log('我点击了box元素,我派发了一个事件类型:james')
        window.dispatchEvent(new Event('james'))
    })
    window.addEventListener('james',function(event) {
      console.log('监听到james事件:',event)
    })
  </script>
</body>
2
3
4
5
6
7
8
9
10
11
12
13
14
# 9、事件委托(event delegation)
事件冒泡在某种情况下可以帮助我们实现强大的事件处理模式 – 事件委托模式(也是一种设计模式)
那么这个模式是怎么样的呢?
- 因为当子元素被点击时,父元素可以通过冒泡可以监听到子元素的点击;
- 并且可以通过event.target获取到当前监听的元素;
案例:一个ul中存放多个li,点击某一个li会变成红色
- 方案一:监听每一个li的点击,并且做出相应;
- 方案二:在ul中监听点击,并且通过event.target拿到对应的li进行处理;
- 因为这种方案并不需要遍历后给每一个li上添加事件监听,所以它更加高效;
<!-- 方案二 -->
<style>
  .active {
    background-color: orange;
    color:red;
    font-size: 30px;
  }
  .item{
    cursor: pointer;
  }
</style>
<body>
  <ul>
    <h3>列表</h3>
    <li class="item">1</li>
    <li class="item">2</li>
    <li class="item">3</li>
    <li class="item">4</li>
    <li class="item">5</li>
    <li class="item">6</li>
    <li class="item">7</li>
    <li class="item">8</li>
    <li class="item">9</li>
    <li class="item">10</li>
  </ul>
  <script>
    var ulEl = document.querySelector('ul')
    //记录当前有active的li元素,初始值为null
    var activeLiE = null
    ulEl.addEventListener("click",function(event) {
      //点击的不是li元素或 点击的还是相同的li元素,则直接返回
      if(event.target.tagName !== "LI" || event.target === activeLiE) return

      //移除上一次点击li添加上的active
      if (activeLiE) activeLiE.classList.remove('active')
      //给当前点击的li元素添加active
      event.target.classList.add('active')
      console.log(event.target)
      // 记录最新的active对应的li
      activeLiE = event.target
    })
  </script>
</body>
2
3
4
5
6
7
8
9
10
11
12
13
14
15
16
17
18
19
20
21
22
23
24
25
26
27
28
29
30
31
32
33
34
35
36
37
38
39
40
41
42
43
- 事件委托的标记
- 某些事件委托可能需要对具体的子组件进行区分(子组件功能不同时),这个时候我们可以使用
data-*对其进行标记: - 比如多个按钮的点击,区分点击了哪一个按钮
- 某些事件委托可能需要对具体的子组件进行区分(子组件功能不同时),这个时候我们可以使用
<body>
  <div class="box">
    <button data-action="search">搜索~</button>
    <button data-action="new">新建~</button>
    <button data-action="remove">移除~</button>
    <button>1111</button>
  </div>
  <script>
    var boxEl = document.querySelector('.box')
    boxEl.addEventListener('click',function(event) {
      var btnEl = event.target
      var action  = btnEl.dataset.action
      console.log(action)
      switch(action) {
        case "search":
          console.log('点击了搜索按钮')
          break
        case "new":
          console.log('点击了新建按钮')
          break
        case 'remove':
          console.log('点击了移除按钮')
          break
        default:
          console.log('点击了其他按钮')
      }
    })
  </script>
</body>
2
3
4
5
6
7
8
9
10
11
12
13
14
15
16
17
18
19
20
21
22
23
24
25
26
27
28
29
- 问题补充:事件捕获和事件冒泡都可以实现事件委托。为什么说事件委托的前提是事件冒泡呢?
- 事件委托一般用的都是事件冒泡来实现,事件冒泡的兼容性更好
# 10、常见的鼠标事件及mouseover和mouseenter的区别
# 10.1.常见的鼠标事件
- 接下来我们来看一下常见的鼠标事件(不仅仅是鼠标设备,也包括模拟鼠标的设备,比如手机、平板电脑)
- 常见的鼠标事件:
| 属性 | 描述 |
|---|---|
| click | 当用户点击某个对象时调用的事件句柄 |
| contextmenu | 在用户点击鼠标右键打开上下文菜单时触发 |
| dbclick | 当用户双击某个对象时调用的事件句柄 |
| mousedown | 鼠标按钮被按下 |
| mouseup | 鼠标按键被松开 |
| mouseover | 鼠标移到某元素之上。(支持冒泡) |
| mouseout | 鼠标从某元素移开。(支持冒泡) |
| mouseenter | 当鼠标指针移动到元素上时触发。(不支持冒泡) |
| mouseleave | 当鼠标指针移出元素时触发。(不支持冒泡) |
| mousemove | 鼠标被移动 |
# 10.2.mouseover和mouseenter的区别
mouseenter和mouseleave
- 不支持冒泡
- 进入子元素依然属于在该元素内,没有任何反应
mouseover和mouseout
- 支持冒泡
- 进入元素的子元素时
- 先调用父元素的mouseout
- 再调用子元素的mouseover因为支持冒泡,所以会将mouseover传递到父元素中;
具体区别可看下面案例理解: 或看这里的图解解释 (opens new window)
<style>
  .box,.bar {
    display: flex;
    align-items: end;
    justify-content: center;
    width: 200px;
    height: 200px;
    background-color: red;
  }
  .item1,.item2 {
    width: 180px;
    height: 100px;
    background-color: pink;
  }
</style>
<body>
  <h3>mouseover/mouseout支持冒泡(可将子元素的事件 委托给父元素)</h3>
  <div class="box">box父元素
    <div class="item1">item1子元素</div>
  </div>

  <h3>mouseenter/mouseleave不支持冒泡(不可将子元素的事件 委托给父元素)</h3>
  <div class="bar">bar父元素
    <div class="item2">item2子元素</div>
  </div>
  <script>
    var boxEl = document.querySelector('.box')
    // 鼠标在子元素上,style.backgroundColor的样式加给子元素;在父元素上则样式加给父元素(通过冒泡实现事件委托)
    boxEl.addEventListener('mouseover',function(event) {
      console.log(`鼠标在${event.target.className}上:mouseover`)
      event.target.style.backgroundColor = 'yellow'
    })
    boxEl.addEventListener('mouseout',function(event) {
      console.log(`鼠标在${event.target.className}外:mouseout`)
      event.target.style.backgroundColor = ''//style改变样式:如果我们将值设置为空字符串,那么会使用CSS的默认样式(了解):
    })

    // 鼠标在子元素和父元素上,style.backgroundColor的样式都是加给父元素(不支持冒泡,没有实现事件委托)
    var barEl = document.querySelector('.bar')
    barEl.addEventListener('mouseenter',function(event) {
      console.log(`鼠标移入${event.target.className}:mouseenter`)
      event.target.style.backgroundColor= 'yellow'
    })
    barEl.addEventListener('mouseleave',function(event) {
      console.log(`鼠标移出${event.target.className}:mouseleave`)
      event.target.style.backgroundColor = ''
    })
  </script>
</body>
2
3
4
5
6
7
8
9
10
11
12
13
14
15
16
17
18
19
20
21
22
23
24
25
26
27
28
29
30
31
32
33
34
35
36
37
38
39
40
41
42
43
44
45
46
47
48
49
# 11、常见的键盘事件
- 常见的键盘事件:
- 键盘时间中的event对象是点击的那个按键
| 属性 | 描述 |
|---|---|
| onkeydown | 某个键盘按键被按下 |
| onkeypress | 某个键盘按键被按下(文本正在被输入) |
| onkeyup | 某个键盘按键被松开 |
- 事件的执行顺序是 onkeydown、onkeypress、onkeyup
- down事件先发生;
- press发生在文本被输入;
- up发生在文本输入完成;(按键抬起或松开)
- 具体onkeydown和onkeypress的区别,可以跑下面代码按住:shift+ a 和 单独按shift 看打印结果来理解
<input type='text'>
<body>
  <script>
    document.querySelector('input').onkeydown = function(event) {
      console.log('onkeydown')
    }
    document.querySelector('input').onkeypress = function(event) {
      console.log('onkeypress')
    }
    document.querySelector('input').onkeyup = function(event) {
      console.log('onkeyup')
    }
  </script>
</body>
2
3
4
5
6
7
8
9
10
11
12
13
14
- 我们可以通过key和code来区分按下的键:
- code:“按键代码”("KeyA","ArrowLeft" 等),特定于键盘上按键的物理位置。
- key:字符("A","a" 等),对于非字符(non-character)的按键,通常具有与 code 相同的值。)
- 案例:当按回车键时h3元素内容变红 且 input元素获取焦点
<h3>我是h3标签</h3>
<input type='text'>
<body>
  <script>
    window.addEventListener('keyup',function (event) {
      console.log(event, event.key, event.code)
      if (event.code === "Enter") {//当按回车键时h3内容变红且input元素获取焦点
        document.querySelector('h3').style.color = 'red'
        document.querySelector('input').focus()
      }
    })
  </script>
</body>
2
3
4
5
6
7
8
9
10
11
12
13
# 12、常见的表单事件
- 针对表单也有常见的事件:
| 属性 | 描述 |
|---|---|
| onchange | 该事件在表单元素的内容改变(且失去焦点时)时触发( <input>, <keygen>, <select>, 和 <textarea>) |
| oninput | 元素获取用户输入时触发 |
| onfocus | 元素获取焦点时触发 |
| onblur | 元素失去焦点时触发 |
| onreset | 表单重置时触发 |
| onsubmit | 表单提交时触发 |
<body>
  <form action="https://www.baidu.com/s">
    <input type="text" name="wd" value="提交,模拟百度一下">
    <input type="submit" value="提交">
    <input type="reset" value="重置">
  </form>
  <script>
    var formEl = document.querySelector('form')
    var inputEls = document.querySelectorAll('input')

    inputEls[0].onchange = function() {
      console.log('onchange:内容改变时触发')
    }
    inputEls[0].oninput = function() {
      console.log("oninput:用户输入时触发")
    }
    inputEls[0].onfocus = function() {
      console.log("onfocus:元素获取焦点时触发")
    }
    inputEls[0].onblur = function() {
      console.log("onblur:元素失去焦点时触发")
    }

    formEl.onsubmit = function() {
      alert('提交数据啦')
    }
    formEl.onreset = function(addEventListener) {
      // 阻止事件的默认行为(这里它的事件默认行为:重置;就被取消了)
      event.preventDefault()
      alert('数据重置-但是在前面我的事件默认行为:重置,被取消了;所以无效')
    }
  </script>
</body>
2
3
4
5
6
7
8
9
10
11
12
13
14
15
16
17
18
19
20
21
22
23
24
25
26
27
28
29
30
31
32
33
# 13、文档加载事件onload
- 如下情况:我们会发现写的js不起作用
- 因为加载script元素时,下面的元素还没有加载,所以获取不到div.box元素,要起作用 script元素必须放在所有 HTML 元素的下方;
- 下面这种写法有没有办法可以让script元素中的内容等到HTML元素都加载完了 再加载呢?文档加载事件onload
<body>
  <script>
    document.querySelector('.box').style.color = 'red'
  </script>
  <div class="box">我是box</div>
</body>
2
3
4
5
6
- DOMContentLoaded:浏览器已完全加载 HTML,并构建了 DOM 树,但像
<img>和样式表之类的外部资源可能尚未加载完成。 - load:浏览器不仅加载完成了 HTML,还加载完成了所有外部资源:图片,样式等。
<!-- 执行如下代码记得清空缓存,并重新加载;即可得到下面打印的结果;
     即:DOMContentLoaded和load的区别就显而易见了-->
<script>
  window.addEventListener('DOMContentLoaded',function() {
    var imgEl = document.querySelector('img')
    console.log(imgEl.offsetWidth,imgEl.clientWidth)//0 0

  })

  window.onload = function() {
    document.querySelector('.box').style.color = 'red'
    console.log(document.querySelector('.box'))

    var imgEl = document.querySelector('img')
    console.log(imgEl.clientWidth,imgEl.clientWidth)// 909  909
  }
</script>
<div class="box">我是box</div>
<img src="https://img2.baidu.com/it/u=3161592096,3072148052&fm=253&fmt=auto&app=120&f=PNG?w=909&h=482" alt="">
2
3
4
5
6
7
8
9
10
11
12
13
14
15
16
17
18
19
# 14、window定时器方法
有时我们并不想立即执行一个函数,而是等待特定一段时间之后再执行,我们称之为“计划调用(scheduling a call)”。
目前有两种方式可以实现:
- setTimeout 允许我们将函数推迟到一段时间间隔之后再执行。
- setInterval 允许我们重复运行一个函数,从一段时间间隔之后开始运行,之后以该时间间隔连续重复运行该函数。
并且通常情况下有提供对应的取消方法:
- clearTimeout:取消setTimeout的定时器;
- clearInterval:取消setInterval的定时器;
大多数运行环境都有内置的调度程序,并且提供了这些方法:
- 目前来讲,所有浏览器以及 Node.js 都支持这两个方法;
- 所以我们后续学Node的时候,也可以在Node中使用它们;
# 15、setTimeout、clearTimeout的使用
setTimeout的语法如下:
var timeoutID = setTimeout(function|code[, delay, arg1, arg2, ...]);1- function|code:想要执行的函数或代码字符串。
- 一般传入的都是函数,由于某些历史原因,支持传入代码字符串,但是不建议这样做;
- delay:执行前的延时,以毫秒为单位(1000 毫秒 = 1 秒),默认值是 0;
- arg1,arg2…:要传入被执行函数(或代码字符串)的参数列表;
- function|code:想要执行的函数或代码字符串。
clearTimeout方法:
- setTimeout 在调用时会返回一个“定时器标识符(timer identifier)”,我们可以使用它来取消执行
<button class="set">执行setTimeout</button>
<button class="clear">执行clearTimeout</button>
<script>
  var setEl = document.querySelector('.set')
  var clearEl = document.querySelector('.clear')
  var timerId
  setEl.onclick = function() {
    timerId = setTimeout(function(name) {
      alert(name+'执行了一次setTimeout;我在点击后3s出现')
    },3000,'lyk')
  }

  clearEl.onclick = function() {
    clearTimeout(timerId)
    alert('我清除了此定时器,所以定时器中的回调函数将不再执行')
  }
</script>
2
3
4
5
6
7
8
9
10
11
12
13
14
15
16
17
# 16、setInterval、clearInterval的使用
setInterval 方法和 setTimeout 的语法相同:所有参数的意义也是相同的;
- 不同的是:setTimeout 只执行一次,setInterval 是每间隔给定的时间周期性执行;
clearInterval方法:
- setInterval也会返回一个“定时器标识符(timer identifier)”,我们可以通过clearInterval来取消这个定时器。
关于定时器还有一些宏任务相关的概念,我们在JavaScript高级详细讲述。
<button class="set">执行setInterval</button>
<button class="clear">执行clearInterval</button>
<script>
  var setEl = document.querySelector('.set')
  var clearEl = document.querySelector('.clear')
  var timerId
  setEl.onclick = function() {
    timerId = setInterval(function(name) {
      alert(name+'执行了一次setIntervalt;回调函数每3秒就会执行一次(无限循环执行)')
    },3000,'lyk')
  }

  clearEl.onclick = function() {
    clearInterval(timerId)
    alert('我清除了此定时器,所以定时中的回调函数将不再执行')
  }
</script>
2
3
4
5
6
7
8
9
10
11
12
13
14
15
16
17
# 17、案例一:实现消息滚动自动切换
<!DOCTYPE html>
<html lang="en">

<head>
  <meta charset="UTF-8">
  <meta http-equiv="X-UA-Compatible" content="IE=edge">
  <meta name="viewport" content="width=device-width, initial-scale=1.0">
  <title>01_实现消息滚动切换</title>
</head>
<style>
  .tip-bar {
    display: inline-flex;
    align-items: center;
    height: 30px;
    background-color: rgba(0, 0, 0, .4);
    border-radius: 16px;
  }

  .tip-bar img {
    width: 30px;
    height: 30px;
    border-radius: 50%;
    margin-right: 5px;
  }

  span {
    font-size: 13px;
    color: white;
    margin-right: 8px;
  }
</style>

<body>
  <div class="tip-bar">
    <img src="https://bfs.biyao.com/group1/M01/A2/67/rBACVGA_iOuAYaTxAAAPbted3yE165.png" alt="">
    <span class="desc">183***138对这件商品感兴趣</span>
  </div>
  <script>
    // 1.从服务器拿到数据ajax/fetch请求
    let tipList = [
      {
        icon: 'https://bfs.biyao.com/group1/M01/A6/97/rBACYWBCHqyAFH5tAAANZXX5Eww646.png',
        title: 'kobe对这件商品感兴趣'
      },
      {
        icon: 'https://bfs.biyao.com/group1/M01/A2/67/rBACVGA_iOuAYaTxAAAPbted3yE165.png',
        title: '123***814对这件商品感兴趣'
      },
      {
        icon: 'https://bfs.biyao.com/group1/M00/7F/4E/rBACYV16HseAP-PnAAAW9bbVoKE463.png',
        title: 'james对这件商品感兴趣'
      }
    ]
    // 2.获取img和span元素
    const imgEl = document.querySelector('img')
    const spanEl = document.querySelector('.desc')

    // function foo() {//按照顺序循环显示
    //   console.log(index)
    //   if(index === tipList.length) index = 0
    //   imgEl.src = tipList[index].icon
    //   spanEl.textContent = tipList[index].title
    //   index++
    // }

    function foo() {//随机显示
      //随机生成新的索引
      var generateIndex = Math.floor(Math.random() * tipList.length)

      //让每一秒出现的信息不一样,如果一样则重新生成,不一样则继续向下执行
      if(index === generateIndex){
        console.log("重复值:",index)
        foo()
        return
      }
      //记录随机生成的 新索引
      index = generateIndex
      console.log(index)
      //给DOM设置内容
      imgEl.src = tipList[index].icon
      spanEl.textContent = tipList[index].title
    }
    //记录此时数据展示时的索引值,初始值为:0
    var index = 0
    //每秒切换一次数据
    setInterval(foo,1000);
  </script>
</body>

</html>
2
3
4
5
6
7
8
9
10
11
12
13
14
15
16
17
18
19
20
21
22
23
24
25
26
27
28
29
30
31
32
33
34
35
36
37
38
39
40
41
42
43
44
45
46
47
48
49
50
51
52
53
54
55
56
57
58
59
60
61
62
63
64
65
66
67
68
69
70
71
72
73
74
75
76
77
78
79
80
81
82
83
84
85
86
87
88
89
90
# 18、案例二:移动端头部关闭
  <style>
    .top-bar {
      display: flex;
      flex-direction: row;
      align-items: center;
      height: 45px;
      width: 375px;
      background-color: black;
      /* 关键 */
      overflow: hidden;
      transition: all .5s ease-out;
    }
    .delete {
      display: flex;
      flex-direction: row;
      justify-content: center;
      align-items: center;
      height: 100%;
      width: 30px;
      cursor: pointer;
    }
    .delete img {
      height: 10px;
      width: 10px;
    }
    .logo {
      height: 30px;
      width: 30px;
      margin-left:3px;
      margin-right: 30px;
      cursor: pointer;
    }
    span {
      color: white;
      font-size: 14px;
      flex: 1;

      white-space: nowrap;
      overflow: hidden;
      text-overflow: ellipsis;
    }
    .btn {
      width: 94px;
      height: 100%;
      line-height: 45px;
      text-align: center;
      font-size: 14px;
      color: #fff;
      background-color: #F63515;
    }
  </style>
</head>
<body>

  <div class="top-bar">
    <div class="delete">
      <img src="https://s1.ax1x.com/2022/07/09/jrf7J1.png" alt="">
    </div>
    <img class="logo" src="https://s1.ax1x.com/2022/07/09/jrfOsO.png" alt="">
    <span>打开京东App,购物更轻松</span>
    <div class="btn">立即打开</div>
  </div>

  <script>
    // 1.获取元素
    var topBar = document.querySelector(".top-bar")
    var deleteEl = topBar.querySelector(".delete")

    // 2.监听delete的点击
    deleteEl.onclick = function() {
      topBar.style.height = 0
      // setTimeout(function() {
      //   topBar.remove()
      // }, 300)
    }

    // 3.监听过渡动画结束
    topBar.ontransitionend = function() {
      topBar.remove()
    }

  </script>

</body>
2
3
4
5
6
7
8
9
10
11
12
13
14
15
16
17
18
19
20
21
22
23
24
25
26
27
28
29
30
31
32
33
34
35
36
37
38
39
40
41
42
43
44
45
46
47
48
49
50
51
52
53
54
55
56
57
58
59
60
61
62
63
64
65
66
67
68
69
70
71
72
73
74
75
76
77
78
79
80
81
82
83
84
# 19、案例三:侧边栏的展示
<!DOCTYPE html>
<html lang="en">

<head>
  <meta charset="UTF-8">
  <meta http-equiv="X-UA-Compatible" content="IE=edge">
  <meta name="viewport" content="width=device-width, initial-scale=1.0">
  <title>Document</title>
</head>
<style>
  .tool-bar {
    position: fixed;
    bottom: 50px;
    right: 30px;

    display: flex;
    flex-direction: column;
    width: 35px;
  }

  .tool-bar .item {
    position: relative;
    width: 35px;
    height: 35px;
    background-color: #7a6e6e;
    margin-bottom: 1px;
    border-radius: 0 3px 3px 0;
  }

  .tool-bar .item .icon {
    display: inline-block;
    background: url(https://s1.ax1x.com/2022/07/10/js3xDe.png) no-repeat;
    width: 100%;
    height: 100%;
    /* background-position: -48px 0; */
  }

  .tool-bar .item .name {
    position: absolute;
    top: 0;
    right: 35px;
    /* left:-62px; */
    width: 0;
    height: 35px;
    line-height: 35px;

    overflow: hidden;
    color: #fff;
    text-align: center;
    font-size: 12px;
    background-color: #7a6e6e;
    cursor: pointer;
    transition: width 0.2s ease;
    border-radius: 3px 0 0 3px;
  }

  .item:hover {
    background-color: #cd1926;
  }

  .item:hover .name {
    background-color: #cd1926;
    /* 方案三:直接用css */
    /* width:62px; */
  }
</style>

<body>
  <div class="tool-bar">
    <div class="item">
      <i class="icon"></i>
      <div class="name">购物车</div>
    </div>
    <div class="item">
      <i class="icon"></i>
      <div class="name">收藏</div>
    </div>
    <div class="item">
      <i class="icon"></i>
      <div class="name">限时活动</div>
    </div>
    <div class="item">
      <i class="icon"></i>
      <div class="name">大礼包</div>
    </div>

  </div>
  <script>
    var toolBarEl = document.querySelector('.tool-bar')
    var iconEls = toolBarEl.querySelectorAll('.icon')
    // 1.动态给icon设置backgroundPosition
    iconEls.forEach(function (item, index) {
      item.style.backgroundPosition = `-48px -${index * 50}px`
    })
    // 2.实现鼠标进入动画
    // 方案一: mouseenter(不能使用事件委托)
    //  var itemEls = document.querySelectorAll(".item")
    //   for (var itemEl of itemEls) {
    //     itemEl.onmouseenter = function() {
    //       var nameEl = this.children[1]
    //       nameEl.style.width = "62px"
    //     }
    //     itemEl.onmouseleave = function() {
    //       var nameEl = this.children[1]
    //       nameEl.style.width = "0"
    //     }
    //   }

    // 方案二: mouseover(使用事件委托)
    toolBarEl.addEventListener('mouseover', function (event) {
      handleMouseEvent(event, '62px', 'mouseover')
    })
    toolBarEl.addEventListener('mouseout', function (event) {
      handleMouseEvent(event, 0, 'mouseout')
    })
    function handleMouseEvent(event, width, name) {
      console.log(event.target,name)
      if (event.target !== toolBarEl) {
        var itemEl = null
        if (event.target.classList.contains('item')) {
          itemEl = event.target
        } else {
          itemEl = event.target.parentElement
        }
        var nameEl = itemEl.children[1]

        nameEl.style.width = width
      }

    }

  </script>
2
3
4
5
6
7
8
9
10
11
12
13
14
15
16
17
18
19
20
21
22
23
24
25
26
27
28
29
30
31
32
33
34
35
36
37
38
39
40
41
42
43
44
45
46
47
48
49
50
51
52
53
54
55
56
57
58
59
60
61
62
63
64
65
66
67
68
69
70
71
72
73
74
75
76
77
78
79
80
81
82
83
84
85
86
87
88
89
90
91
92
93
94
95
96
97
98
99
100
101
102
103
104
105
106
107
108
109
110
111
112
113
114
115
116
117
118
119
120
121
122
123
124
125
126
127
128
129
130
131
132
# 20、案例四:登录页面
<!DOCTYPE html>
<html lang="en">

<head>
  <meta charset="UTF-8">
  <meta http-equiv="X-UA-Compatible" content="IE=edge">
  <meta name="viewport" content="width=device-width, initial-scale=1.0">
  <title>登录页面</title>
</head>
<style>
  body,
  p,
  h2 {
    margin: 0;
    padding: 0;
  }

  input {
    outline: none;
  }

  .css_sprites {
    background: url(https://s1.ax1x.com/2022/07/10/js0pyn.png) no-repeat;
  }

  .login-page {
    position: fixed;
    top: 50%;
    left: 50%;
    width: 280px;
    transform: translate(-50%, -50%);
    padding: 20px 48px;
    background-color: rgb(243, 243, 243);
  }

  .login-page h2 {
    text-align: center;
  }

  .login-page .tips {
    margin: 3px 0;
    padding: 6px 6px;
    font-size: 12px;
    color: rgb(207, 23, 23);
    border-radius: 3px;
    border: 1px solid rgb(224, 221, 221);
    background-color: rgb(247, 196, 205);
    transition: opacity 0.3s ease-in;
  }

  .login-page .tips .error-icon {
    display: inline-block;
    width: 16px;
    height: 16px;
    margin-right: 5px;
    border-radius: 50%;
    vertical-align: middle;
    background-position: -114px -59px;
  }

  .login-page .item {
    position: relative;
    display: flex;
    height: 30px;
    margin-bottom: 16px;
  }

  .login-page .item>i:nth-child(1) {
    display: block;
    width: 36px;
    height: 36px;
    border: 1px solid rgb(199, 194, 194);
    border-right: 0px;
  }

  .login-page .item>input {
    padding: 3px 2px 3px 10px;
    width: 236px;
    height: 100%;
    border: 1px solid rgb(199, 194, 194);
  }

  .login-page .login {
    margin-top: 26px;
    padding: 5px 0;
    text-align: center;
    color: white;
    font-size: 20px;
    cursor: pointer;
    background-color: rgb(190, 50, 50);
  }

  .login-page .item .close-icon {
    width: 13px;
    height: 13px;
    position: absolute;
    top: 12px;
    right: 9px;
    background-position: -36px -154px;
    cursor: pointer;
  }

  .login-page .item .close-icon:hover {
    background-position: -61px -154px;
  }

  .login-page .item .control-icon {
    position: absolute;
    top: 11.5px;
    right: 32px;
    width: 25px;
    height: 15px;
    background-position: -150px -15px;
    cursor: pointer;
  }

  /* .login-page .item .control-icon:hover {
    background-position: -150px -60px;
  } */

  .login-page .username .un-icon {
    background-position: -11px -59px;
  }

  .login-page .password .pw-icon {
    background-position: -59px -59px;
  }

  .login-page .login {
    border: none;
    width: 100%;
  }

  .login-page .login:hover {
    background-color: rgb(205, 87, 87);
  }
</style>

<body>
  <div class="login-page">
    <h2>登录页面</h2>
    <div class="tips" style="opacity: 0;">
      <i class="error-icon css_sprites"></i>
      <span class="desc">用户名或密码不能为空!</span>
    </div>

    <div class="username item">
      <i class="un-icon css_sprites"></i>
      <input type="text" placeholder="邮箱/用户名/登录手机" value="admin">
      <i class="css_sprites close-icon"></i>
    </div>

    <div class="password item">
      <i class="pw-icon css_sprites"></i>
      <input type="password" placeholder="密码" value="123456">
      <i class="css_sprites close-icon"></i>
      <i class="control-icon css_sprites"></i>
    </div>

    <button type="submit" class="login">登 录</button>
  </div>
  <script>
    var passwordEl = document.querySelector('.password')
    var usernameEl = document.querySelector('.username')
    var tipsEl = document.querySelector('.tips')
    var loginEl = document.querySelector('.login')

    usernameEl.addEventListener('click', function (event) {
      console.log(event.target)
      if (event.target.classList.contains('close-icon')) {//点x重置输入框内容
        event.target.previousElementSibling.value = ''
      }
    })

    passwordEl.addEventListener('click', function (event) {
      if (event.target.classList.contains('close-icon')) {//点x重置输入框内容
        event.target.previousElementSibling.value = ''
      }
      if (event.target.classList.contains('control-icon')) {//点击眼睛图标 切换密码可见和加密
        if (passwordEl.children[1].type === "password") {
          console.log(event.target.parentElement.children[1])
          event.target.style.backgroundPosition = '-150px -60px'
          passwordEl.children[1].type = "text"
        } else {
          event.target.style.backgroundPosition = '-150px -15px'
          passwordEl.children[1].type = "password"
        }
      }
    })

    function tips(errorDesc,bgposition) {//封装 提示 功能函数
      tipsEl.children[0].style.backgroundPosition = bgposition || '-114px -59px'
      tipsEl.children[1].textContent = errorDesc
      tipsEl.style.opacity = "1"
      setTimeout(function () {
        tipsEl.style.opacity = "0"
      }, 2000)
    }


    loginEl.addEventListener('click', function (event) {// 对输入的账号密码进行检测并根据检测结果做出相应的提示
      if (usernameEl.children[1].value === "" || passwordEl.children[1].value === "") {
        tips('用户名或密码不能为空!')
      } else if (usernameEl.children[1].value !== "admin") {
        tips('输入的用户名错误!')
      } else if (passwordEl.children[1].value !== "123456") {
        tips('输入的密码错误!')
      } else {
        tips('登录成功!','-114px -85px')
      }
    })

  </script>
</body>

</html>
2
3
4
5
6
7
8
9
10
11
12
13
14
15
16
17
18
19
20
21
22
23
24
25
26
27
28
29
30
31
32
33
34
35
36
37
38
39
40
41
42
43
44
45
46
47
48
49
50
51
52
53
54
55
56
57
58
59
60
61
62
63
64
65
66
67
68
69
70
71
72
73
74
75
76
77
78
79
80
81
82
83
84
85
86
87
88
89
90
91
92
93
94
95
96
97
98
99
100
101
102
103
104
105
106
107
108
109
110
111
112
113
114
115
116
117
118
119
120
121
122
123
124
125
126
127
128
129
130
131
132
133
134
135
136
137
138
139
140
141
142
143
144
145
146
147
148
149
150
151
152
153
154
155
156
157
158
159
160
161
162
163
164
165
166
167
168
169
170
171
172
173
174
175
176
177
178
179
180
181
182
183
184
185
186
187
188
189
190
191
192
193
194
195
196
197
198
199
200
201
202
203
204
205
206
207
208
209
210
211
212
213
214
215
216
# 21、案例五:王者荣耀-main-news:tabControl切换
<!DOCTYPE html>
<html lang="zh-CN">

<head>
  <meta charset="UTF-8">
  <meta http-equiv="X-UA-Compatible" content="IE=edge">
  <meta name="viewport" content="width=device-width, initial-scale=1.0">
  <title>王者荣耀-main-news</title>
  <style>
    .tab_control {
      display: flex;
      align-items: center;
      height: 32px;
      line-height: 29px;/* 决定item的高度,下面item没有设置高度但是有文字,所以高度由行高撑起 */
      background-color: #f5f5f5;
    }

    .tab_control>.item {
      flex: 1;
      color: #999;
      text-align: center;
      cursor: pointer;
      border-bottom: 3px solid transparent;
      transition: border-bottom 0.6s ease;
    }


    /* .tab_control > .item:hover, */
    .tab_control>.item.active {
      color: #333;
      border-bottom-color: #f3c258;
    }

    .tab_control>.line {
      width: 1px;
      height: 20px;
      background-color: #e1e1e1;
    }
  </style>
</head>

<body>
<div style="width:520px;">
  <div class="tab_control">
    <div class="item active">精品栏目</div>
    <div class="line"></div>
    <div class="item">赛事精品</div>
    <div class="line"></div>
    <div class="item">英雄攻略</div>
  </div>
</div>
</body>

  <script>
    // 1.获取元素
    var tabControl = document.querySelector(".tab_control")

    // 2.监听鼠标进入(事件委托)
    var activeLiEl = tabControl.querySelector(".active")
    tabControl.onmouseover = function (event) {
      // 1.拿到事件发生的对象
      var itemEl = event.target
      if (itemEl.classList.contains("item")) {
        // 其他的取消active
        // 1.for循环所有的item
        // 2.querySelector(".active")
        // 3.记录当前的active对应的item
        activeLiEl.classList.remove("active")

        // 当前进入的item变成active
        itemEl.classList.add("active")

        // 将最新的itemEl变成activeLiEl
        activeLiEl = itemEl
      }
    }

  </script>
</body>

</html>
2
3
4
5
6
7
8
9
10
11
12
13
14
15
16
17
18
19
20
21
22
23
24
25
26
27
28
29
30
31
32
33
34
35
36
37
38
39
40
41
42
43
44
45
46
47
48
49
50
51
52
53
54
55
56
57
58
59
60
61
62
63
64
65
66
67
68
69
70
71
72
73
74
75
76
77
78
79
80
81
# 22、案例六:轮播图
<!DOCTYPE html>
<html lang="en">

<head>
  <meta charset="UTF-8">
  <meta http-equiv="X-UA-Compatible" content="IE=edge">
  <meta name="viewport" content="width=device-width, initial-scale=1.0">
  <title>王者荣耀轮播图实现</title>
</head>
<style>
  /* margin/padding重置 */
  body,h1,h2,h3,ul,ol,li,p,dl,dt,dd {
    padding: 0;
    margin: 0;
  }

  li {
    list-style: none;
  }

  /* a元素重置 */
  a {
    text-decoration: none;
  }

  /* img的vertical-align重置 */
  img {
    vertical-align: top;
  }

  .banner {
    position: fixed;
    top: 50%;
    left: 50%;
    transform: translate(-50%, -50%);
    width: 605px;
  }

  .img-list {
    position: relative;
    display: flex;
    height: 298px;
    overflow: hidden;
  }

  .img-list .item {
    position: absolute;
    width: 100%;
    left: 100%;
  }

  .img-list .item:nth-child(1) {
    transition: left 300ms ease;
  }

  .img-list .item:first-child {
    left: 0;
  }

  .img-list .item a {
    display: block;
  }

  .img-list .item a img {
    width: 100%;
  }

  .title-list {
    display: flex;
    align-items: center;
  }

  .title-list .item {
    flex: 1;
    text-align: center;
  }

  .title-list .item a {
    display: block;
    padding: 16px 3px;
    background-color: #000;
    font-size: 14px;
    color: #b1b2be;
  }

  .title-list .item.active a,
  .title-list .item a:hover {
    color: #f3c258;
    background-color: rgba(0, 0, 0, .8);
  }
</style>

<body>
  <div class="banner">
    <ul class="img-list">
      <li class="item">
        <a href="">
          <img src="https://s1.ax1x.com/2022/07/17/j5I7DO.jpg" alt="">
        </a>
      </li>
      <li class="item">
        <a href="">
          <img src="https://s1.ax1x.com/2022/07/17/j5Ix2t.jpg" alt="">
        </a>
      </li>
      <li class="item">
        <a href="">
          <img src="https://s1.ax1x.com/2022/07/17/j5IzxP.jpg" alt="">
        </a>
      </li>
      <li class="item">
        <a href="">
          <img src="https://s1.ax1x.com/2022/07/17/j5opKf.jpg" alt="">
        </a>
      </li>
      <li class="item">
        <a href="">
          <img src="https://s1.ax1x.com/2022/07/17/j5o9r8.jpg" alt="">
        </a>
      </li>
    </ul>
    <ul class="title-list">
      <li class="item active">
        <a href="#">桑启的旅途故事</a>
      </li>
      <li class="item">
        <a href="#">启示之音抢先听</a>
      </li>
      <li class="item">
        <a href="#">谁成为版本之子</a>
      </li>
      <li class="item">
        <a href="#">观赛体验升级</a>
      </li>
      <li class="item">
        <a href="#">季后赛开战</a>
      </li>
    </ul>
  </div>
  <script>
    // 1.获取元素
    var imgListEl = document.querySelector('.img-list')
    var titleListEl = document.querySelector('.title-list')
    var titleItemEls = titleListEl.querySelectorAll('.item')
    var bannerEl = document.querySelector('.banner')

    // 定义变量保存一些的状态
    var activeEl = titleListEl.querySelector('.active')
    var currentIndex = 0//记录当前有active的底部title元素索引
    var preIndex = 0//记录上一个有active的底部title元素索引
    var timerId = null

    // 刚进入页面调用 自动轮播函数
    start()

    // 自动轮播函数
    function start() {
      console.log('开始自动轮播')
      timerId = setInterval(function () {
        preIndex = currentIndex
        currentIndex++
        if (currentIndex === titleListEl.children.length) currentIndex = 0
        switchBanner()
      }, 3000)
    }

    // 实现鼠标停留在banner上,清除轮播;
    bannerEl.onmouseenter = function () {
      console.log("关闭自动轮播")
      clearInterval(timerId)
    }
    // 实现鼠标离开banner:重新开始轮播
    bannerEl.onmouseleave = function () {
      start()
    }

    // 2.底部titles的切换, 同时进行轮播
    titleListEl.addEventListener('mouseover', function (event) {

      // 确定发生鼠标进入的元素
      var titleItemEl = event.target.parentElement
      console.log(titleItemEl)

      if (!titleItemEl.classList.contains('item')) return
      // 获取当前鼠标进入item的索引
      var titleItemIndex = Array.from(titleItemEls).findIndex(item => item === titleItemEl)
      preIndex = currentIndex
      currentIndex = titleItemIndex
      switchBanner()

    })


    // 底部title的active的切换及动画方式封装
    function switchBanner() {
      console.log(preIndex, currentIndex)

      for (var i = 0; i < imgListEl.children.length; i++) {
        var imgEl = imgListEl.children[i]
        if (i === currentIndex) {
          imgEl.style.transition = "left 300ms ease"
          imgEl.style.left = "0"
        } else if (i < currentIndex) {
          if (i !== preIndex) {//保留当前和上一次有acitve对应img元素的动画,其他的img元素的动画进行重置(处理img元素的索引小于当前元素索引的情况)
            imgEl.style.transition = ""
          }
          imgEl.style.left = "-100%"
        } else {
          if (i !== preIndex) {//保留当前和上一次有acitve对应img元素的动画,其他的img元素的动画进行重置(处理img元素的索引大于当前元素索引的情况)
            imgEl.style.transition = ""
          }
          imgEl.style.left = "100%"
        }


      }

      activeEl.classList.remove('active')

      var currentItemEl = titleListEl.children[currentIndex]
      currentItemEl.classList.add('active')
      activeEl = currentItemEl
      // imgListEl.style.transform = `translateX(-${currentIndex * 604}px)`
    }
  </script>
</body>

</html>
2
3
4
5
6
7
8
9
10
11
12
13
14
15
16
17
18
19
20
21
22
23
24
25
26
27
28
29
30
31
32
33
34
35
36
37
38
39
40
41
42
43
44
45
46
47
48
49
50
51
52
53
54
55
56
57
58
59
60
61
62
63
64
65
66
67
68
69
70
71
72
73
74
75
76
77
78
79
80
81
82
83
84
85
86
87
88
89
90
91
92
93
94
95
96
97
98
99
100
101
102
103
104
105
106
107
108
109
110
111
112
113
114
115
116
117
118
119
120
121
122
123
124
125
126
127
128
129
130
131
132
133
134
135
136
137
138
139
140
141
142
143
144
145
146
147
148
149
150
151
152
153
154
155
156
157
158
159
160
161
162
163
164
165
166
167
168
169
170
171
172
173
174
175
176
177
178
179
180
181
182
183
184
185
186
187
188
189
190
191
192
193
194
195
196
197
198
199
200
201
202
203
204
205
206
207
208
209
210
211
212
213
214
215
216
217
218
219
220
221
222
223
224
225
226
227
228
# 23、案例七:书籍购物车
<!DOCTYPE html>
<html lang="en">

<head>
  <meta charset="UTF-8">
  <meta http-equiv="X-UA-Compatible" content="IE=edge">
  <meta name="viewport" content="width=device-width, initial-scale=1.0">
  <title>购物车实现</title>
  <style>
    table {
      border-collapse: collapse;
    }

    table thead {
      background-color: #f5f5f5;

    }

    table thead th,
    table tbody td {
      border: 1px solid #aaa;
      padding: 8px 12px;
      text-align: center;
    }
  </style>
</head>

<body>
  <table>
    <thead>
      <tr>
        <th>编号</th>
        <th>书籍名称</th>
        <th>出版日期</th>
        <th>价格</th>
        <th>购买数量</th>
        <th>操作</th>
      </tr>
    </thead>
    <tbody>
    </tbody>
  </table>
  <h2>
    总价格:¥<span class="price-count">0</span>
  </h2>
  <script>
    var books = [
      {
        id: 1,
        name: '《算法导论》',
        date: '2006-09',
        price: 85.00,
        count: 3
      },
      {
        id: 2,
        name: '《UNIX编程艺术》',
        date: '2006-02',
        price: 59.00,
        count: 2
      },
      {
        id: 3,
        name: '《编程珠玑》',
        date: '2008-10',
        price: 39.00,
        count: 5
      },
      {
        id: 4,
        name: '《代码大全》',
        date: '2006-03',
        price: 128.00,
        count: 8
      }
    ]

    var tbodyEl = document.querySelector('tbody')

    books.forEach(function (item) {
      // 创建tr
      var createTrEl = document.createElement('tr')

      for (var key in item) {
        var createTdEl = document.createElement('td')
        createTdEl.textContent = item[key]
        if (key === 'price') {
          createTdEl.textContent = '¥' + item[key]
        }
        createTrEl.append(createTdEl)
      }

      // 创建一个删除按钮
      var deleteTdEl = document.createElement('td')
      var deleteBtnEl = document.createElement('button')
      deleteBtnEl.textContent = '删除'
      deleteTdEl.append(deleteBtnEl)
      createTrEl.append(deleteTdEl)

      //将创建的tr插入到tbody中
      tbodyEl.append(createTrEl)


      // 删除按钮功能实现
      deleteBtnEl.onclick = function () {
        // 拿到当前按钮所在的tr元素,并删除
        var trEl = this.parentElement.parentElement
        trIndex = trEl.sectionRowIndex//获取当前按钮的tr在tbody中的索引
        trEl.remove()

        // 删除被删的tr元素对应books中的数据对象
        books.splice(trIndex, 1)

        // 每点击删除重新计算总价
        calcTotalPrice()
      }

      // 计算总价格函数封装
      var priceSpan = document.querySelector('.price-count')
      calcTotalPrice()//刚进入页面计算总价

      function calcTotalPrice() {
        var totalPrice = books.reduce(function (preValue, currentValue) {
          return preValue + currentValue.price * currentValue.count
        }, 0)
        priceSpan.textContent = totalPrice
      }
    })

  </script>
</body>

</html>
2
3
4
5
6
7
8
9
10
11
12
13
14
15
16
17
18
19
20
21
22
23
24
25
26
27
28
29
30
31
32
33
34
35
36
37
38
39
40
41
42
43
44
45
46
47
48
49
50
51
52
53
54
55
56
57
58
59
60
61
62
63
64
65
66
67
68
69
70
71
72
73
74
75
76
77
78
79
80
81
82
83
84
85
86
87
88
89
90
91
92
93
94
95
96
97
98
99
100
101
102
103
104
105
106
107
108
109
110
111
112
113
114
115
116
117
118
119
120
121
122
123
124
125
126
127
128
129
130
131
132
133