十二、Javascript网络编程XHR/Fetch 和 http协议
Lyk 2022/8/13 ES6前后端分离服务端渲染SSR
# 1、前后端分离和服务端渲染
# 1.1.前后端分离的优势
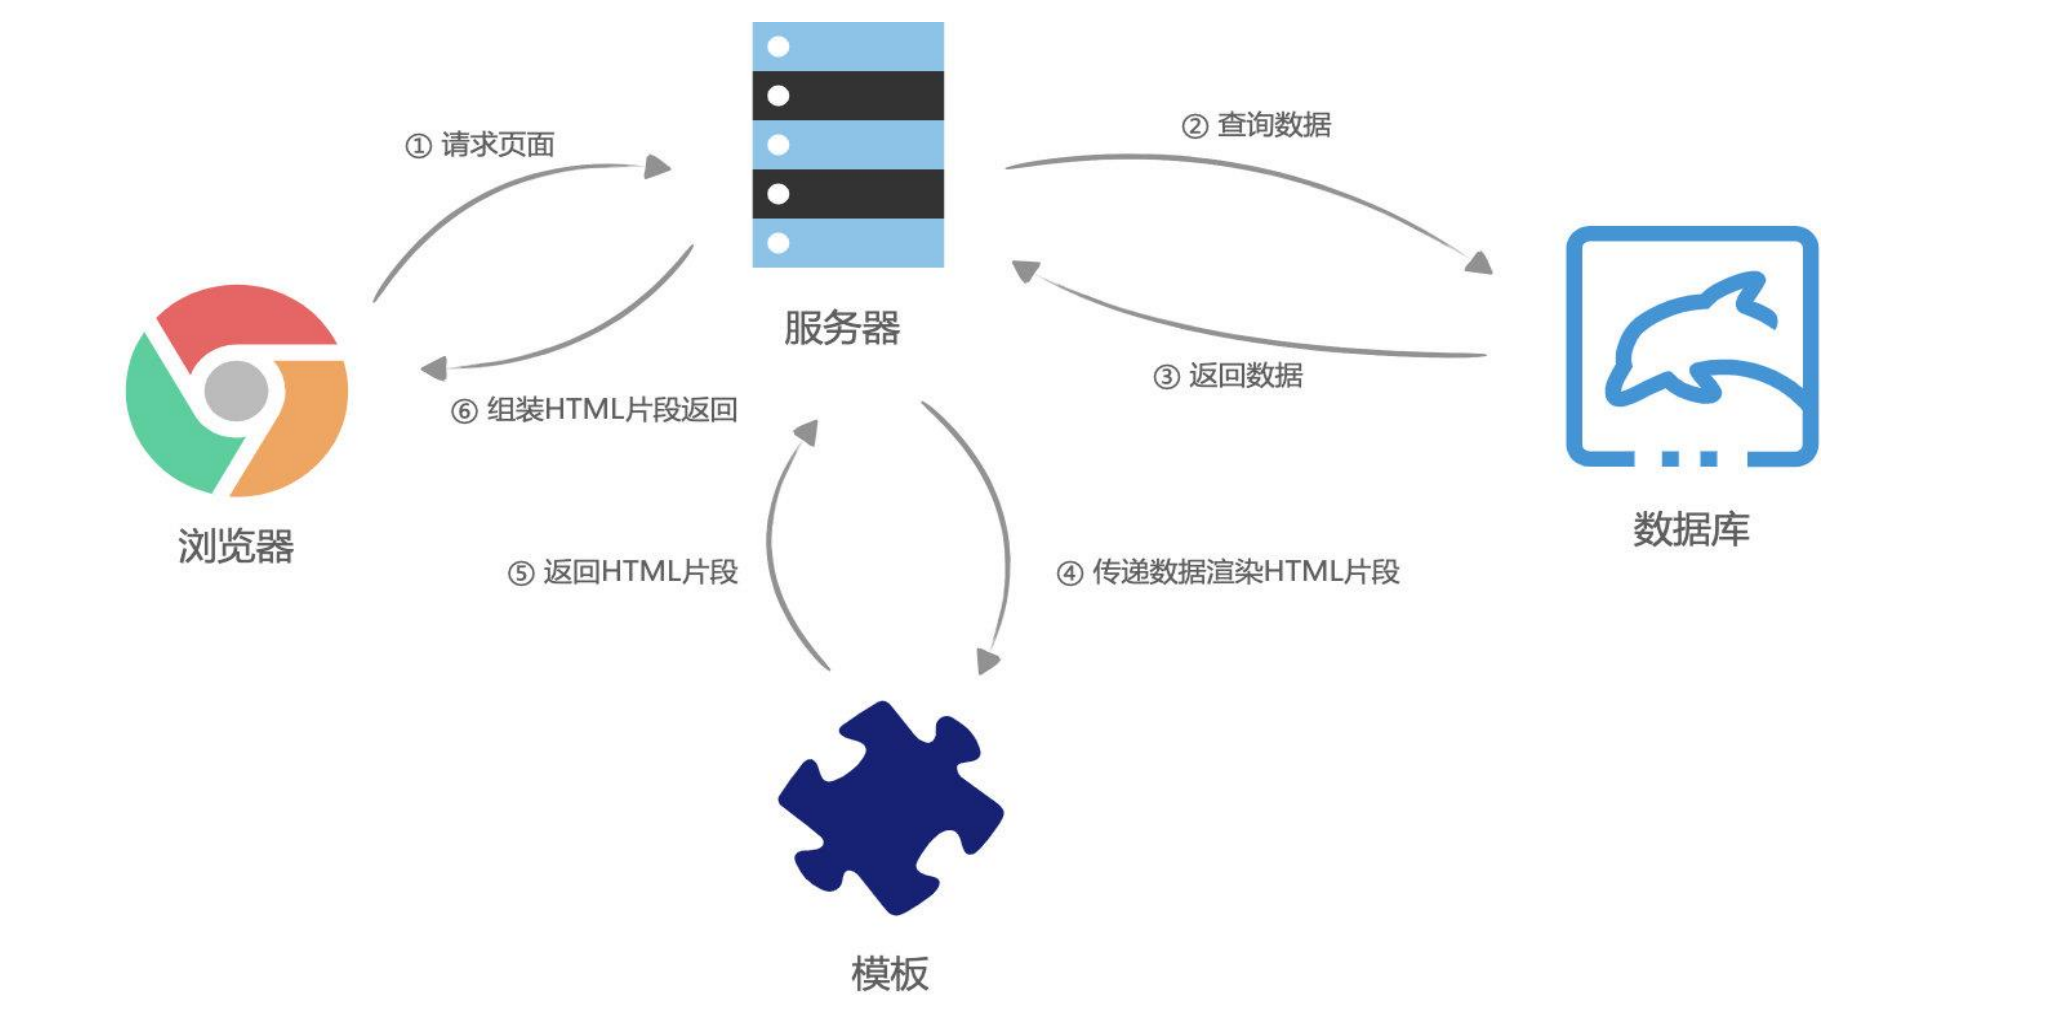
- 早期的网页都是通过后端渲染来完成的:服务器端渲染(SSR,server side render):
- 客户端发出请求 -> 服务端接收请求并返回相应HTML文档 -> 页面刷新,客户端加载新的HTML文档;
- 服务端接收请求并返回相应HTML文档(做了这些事->) :服务器接收到请求,然后我们会根据请求去数据库中查询对应表,然后进行相关操作;操作完成后,在服务端(通过:jsp,php等技术)组装成新的HTML文档并返回给客户端进行展示
- 服务器端渲染的缺点:
- 当用户点击页面中的某个按钮向服务器发送请求时,页面本质上只是一些数据发生了变化,而此时服务器却要将重绘的整个页面再返回给浏览器加载,这显然有悖于程序员的“DRY( Don‘t repeat yourself 不要重复你自己)”原则;
- 而且明明只是一些数据的变化却迫使服务器要返回整个HTML文档,这本身也会给网络带宽带来不必要的开销。
- 有没有办法在页面数据变动时,只向服务器请求新的数据,并且在阻止页面刷新的情况下,动态的替换页面中展示的数据呢?
- 答案正是“AJAX”。
- AJAX是“Asynchronous JavaScript And XML”的缩写(异步的JavaScript和XML),是一种实现 无页面刷新 获取服务器数据的技术。
- AJAX最吸引人的就是它的“异步”特性,也就是说它可以在不重新刷新页面的情况下与服务器通信,交换数据,或更新页面。
- 你可以使用AJAX最主要的两个特性做下列事:
- 在不重新加载页面的情况下发送请求给服务器;
- 接受并使用从服务器发来的数据。
# 1.2.网页的渲染过程 – 服务器端渲染
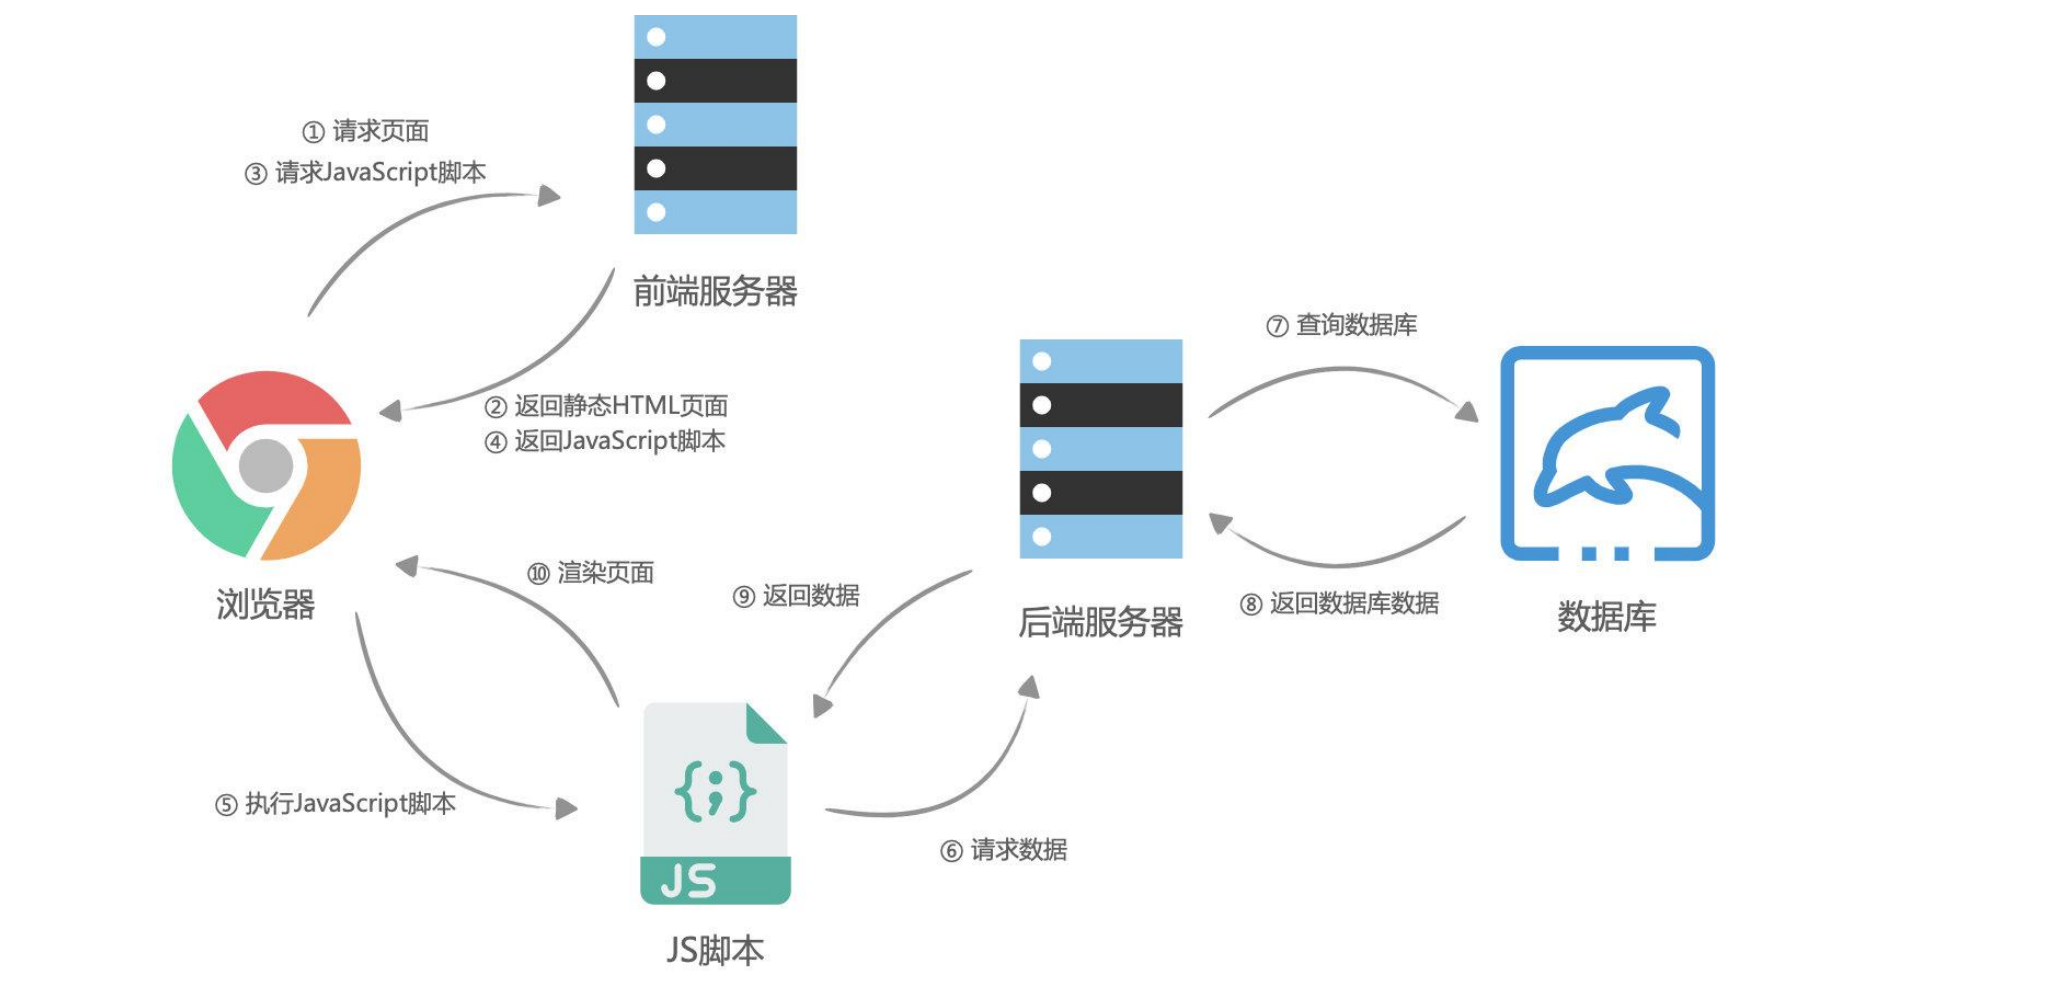
# 1.3.网页的渲染过程 – 前后端分离
# 2、HTTP的深入学习
# 2.1.什么是HTTP?
- 什么是HTTP呢?我们来看一下维基百科的解释:
- 超文本传输协议(英语:HyperText Transfer Protocol,缩写:HTTP)是一种用于分布式、协作式和超媒体信息系统的应用层协议;
- HTTP是万维网的数据通信的基础,设计HTTP最初的目的是为了提供一种发布和接收HTML页面的方法;
- 通过HTTP或者HTTPS协议请求的资源由统一资源标识符(Uniform Resource Identifiers,URI)来标识;
- HTTP是一个客户端(用户)和服务端(网站)之间请求和响应的标准。
- 通过使用网页浏览器、网络爬虫或者其它的工具,客户端发起一个HTTP请求到服务器上指定端口(默认端口为80);
- 我们称这个客户端为用户代理程序(user agent);
- 响应的服务器上存储着一些资源,比如HTML文件和图像。
- 我们称这个响应服务器为源服务器(origin server);
- 通过使用网页浏览器、网络爬虫或者其它的工具,客户端发起一个HTTP请求到服务器上指定端口(默认端口为80);

# 2.2.网页中资源的获取
- 我们网页中的资源通常是被放在Web资源服务器中,由浏览器自动发送HTTP请求来获取、解析、展示的。
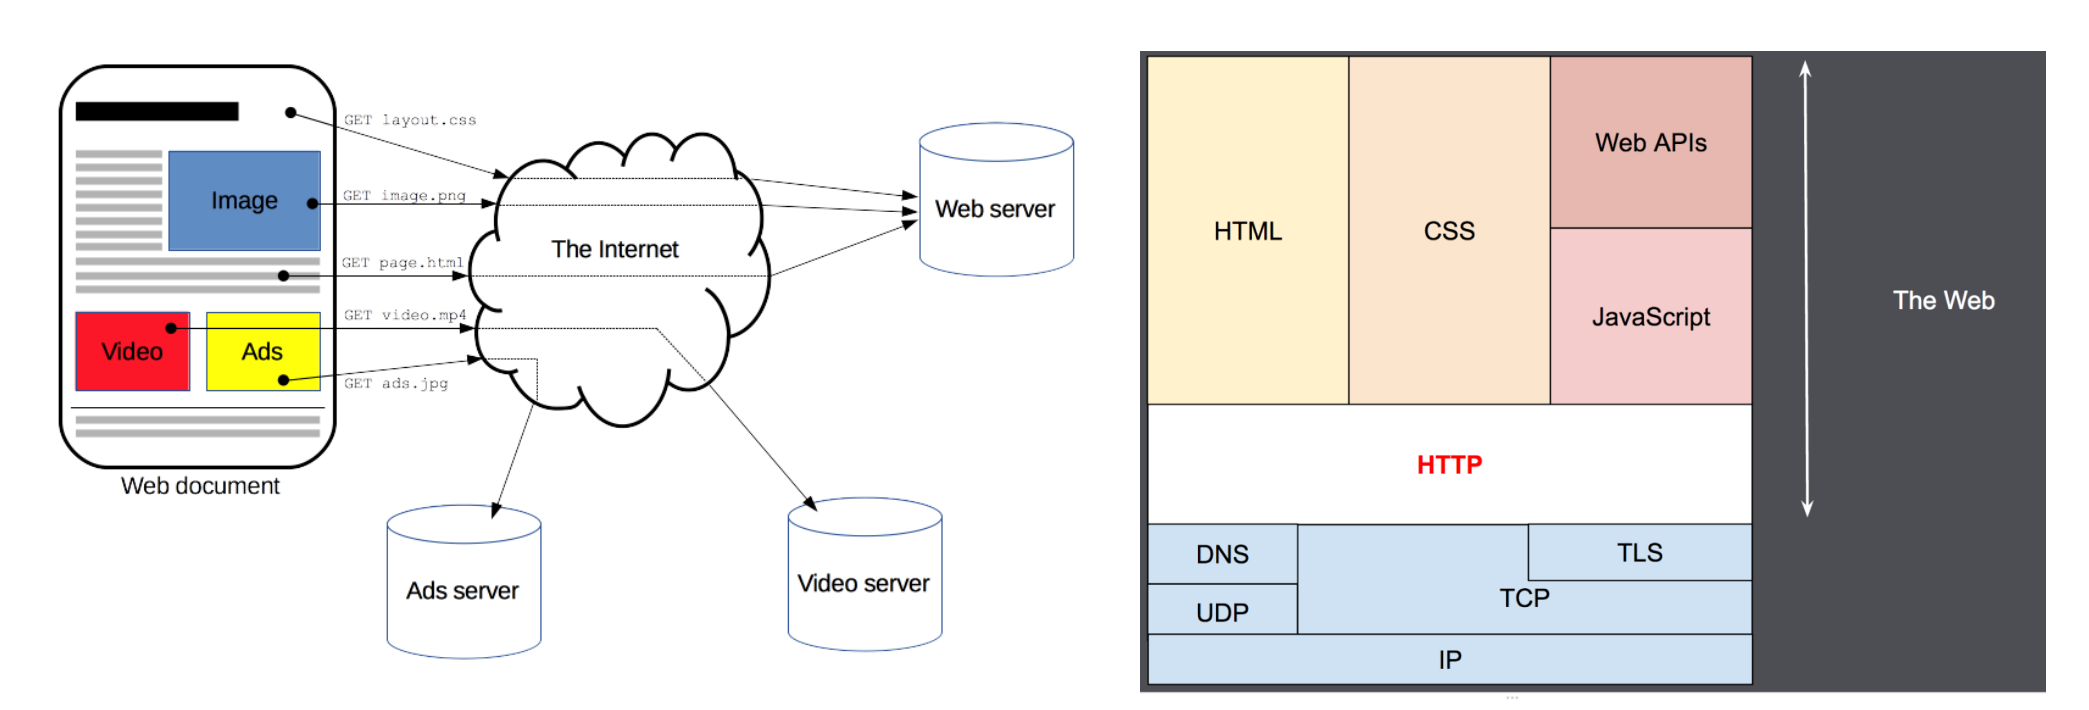
- 目前我们页面中很多数据是动态展示的:
- 比如页面中的数据展示、搜索数据、表单验证等等,也是通过在JavaScript中发送HTTP请求获取的;
# 2.3.HTTP的组成
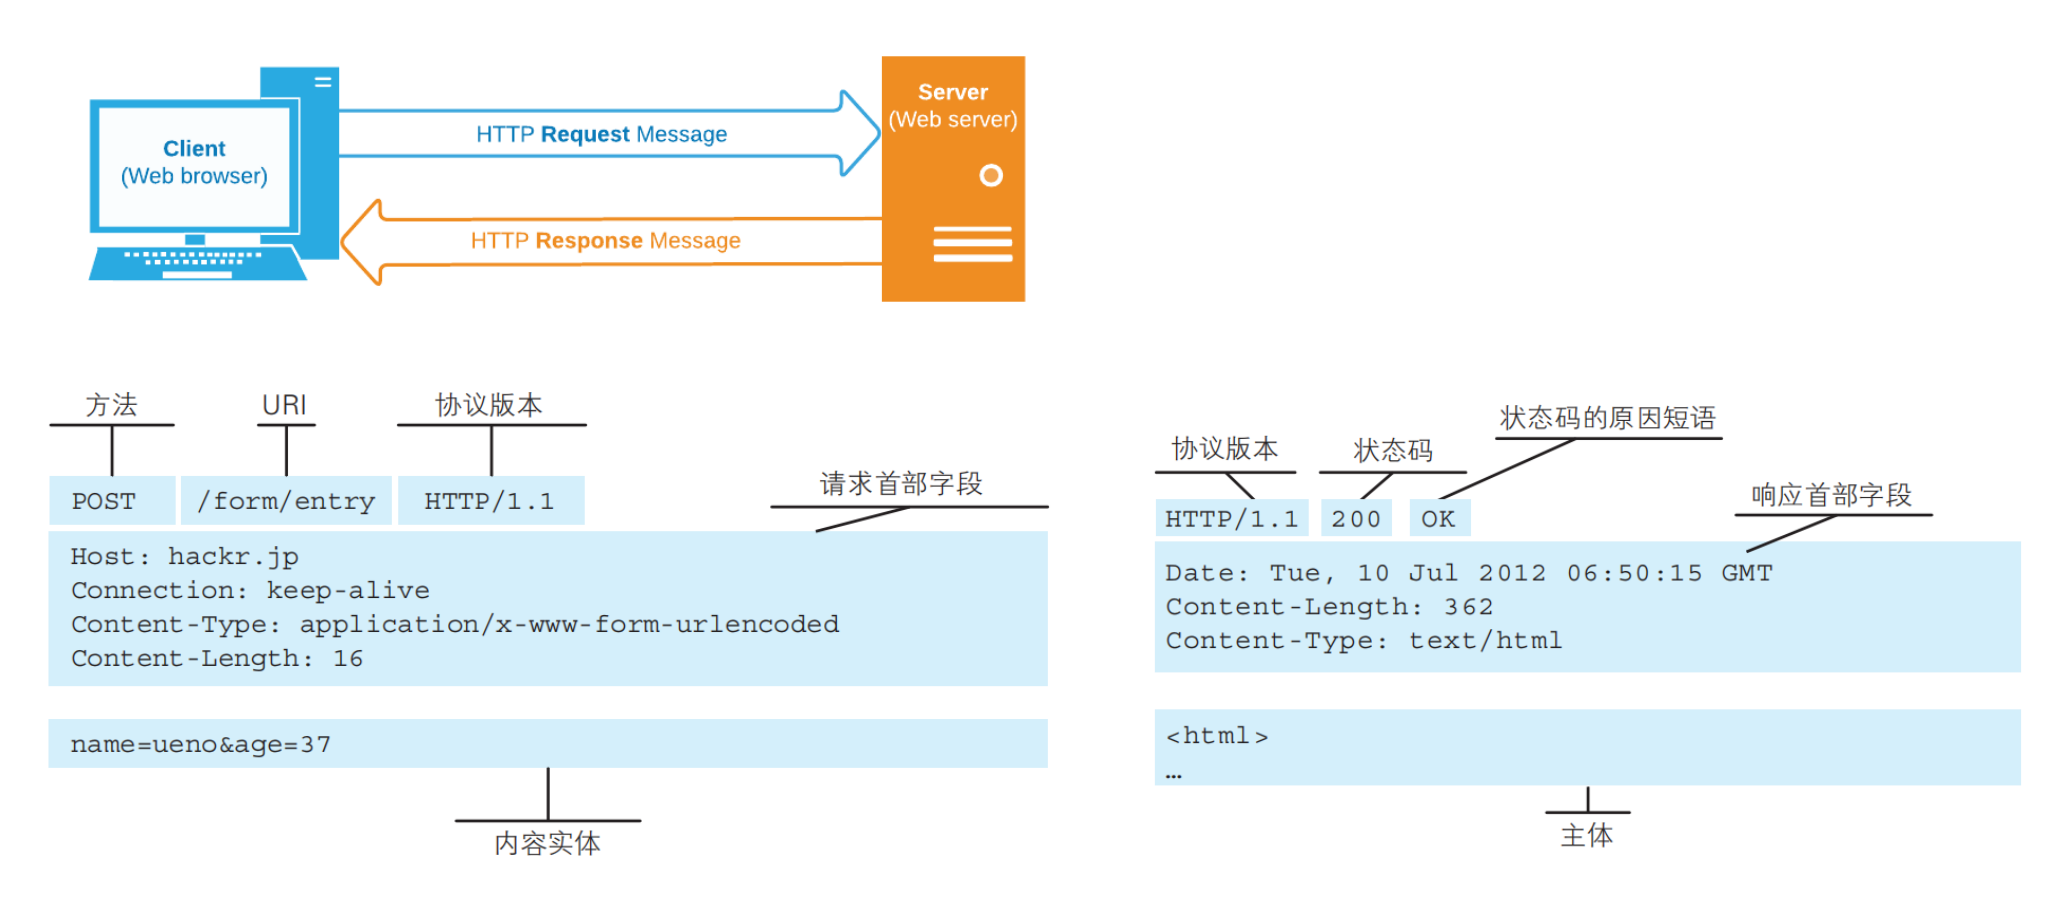
- 一次HTTP请求主要包括:请求(Request)和响应(Response)
# 2.4.HTTP的版本
- HTTP/0.9
- 发布于1991年;
- 只支持GET请求方法获取文本数据,当时主要是为了获取HTML页面内容;
- HTTP/1.0
- 发布于1996年;
- 支持POST、HEAD等请求方法,支持请求头、响应头等,支持更多种数据类型(不再局限于文本数据) ;
- 但是浏览器的每次请求都需要与服务器建立一个TCP连接,请求处理完成后立即断开TCP连接,每次建立连接增加了性能损耗;
- HTTP/1.1(目前使用最广泛的版本)
- 发布于1997年;
- 增加了PUT、DELETE等请求方法;
- 采用持久连接(Connection: keep-alive),多个请求可以共用同一个TCP连接;
- 2015年,HTTP/2.0
- 2018年,HTTP/3.0
# 2.5.HTTP的请求方式
- 在RFC中定义了一组请求方式,来表示要对给定资源执行的操作:
- GET:GET 方法请求一个指定资源的表示形式,使用 GET 的请求应该只被用于获取数据。
- HEAD:HEAD 方法请求一个与 GET 请求的响应相同的响应,但没有响应体。
- 比如在准备下载一个文件前,先获取文件的大小,再决定是否进行下载;
- POST:POST 方法用于将实体提交到指定的资源。
- PUT:PUT 方法用请求有效载荷(payload)替换目标资源的所有当前表示;
- DELETE:DELETE 方法删除指定的资源;
- PATCH:PATCH 方法用于对资源应部分修改;
- CONNECT:CONNECT 方法建立一个到目标资源标识的服务器的隧道,通常用在代理服务器,网页开发很少用到。
- TRACE:TRACE 方法沿着到目标资源的路径执行一个消息环回测试。
- 在开发中使用最多的是GET、POST请求;
- 在后续的后台管理项目中,我们也会使用PATCH、DELETE请求;
# 2.6.HTTP Request Header(请求头)
- 在request对象的header中也包含很多有用的信息,客户端会默认传递过来一些信息:
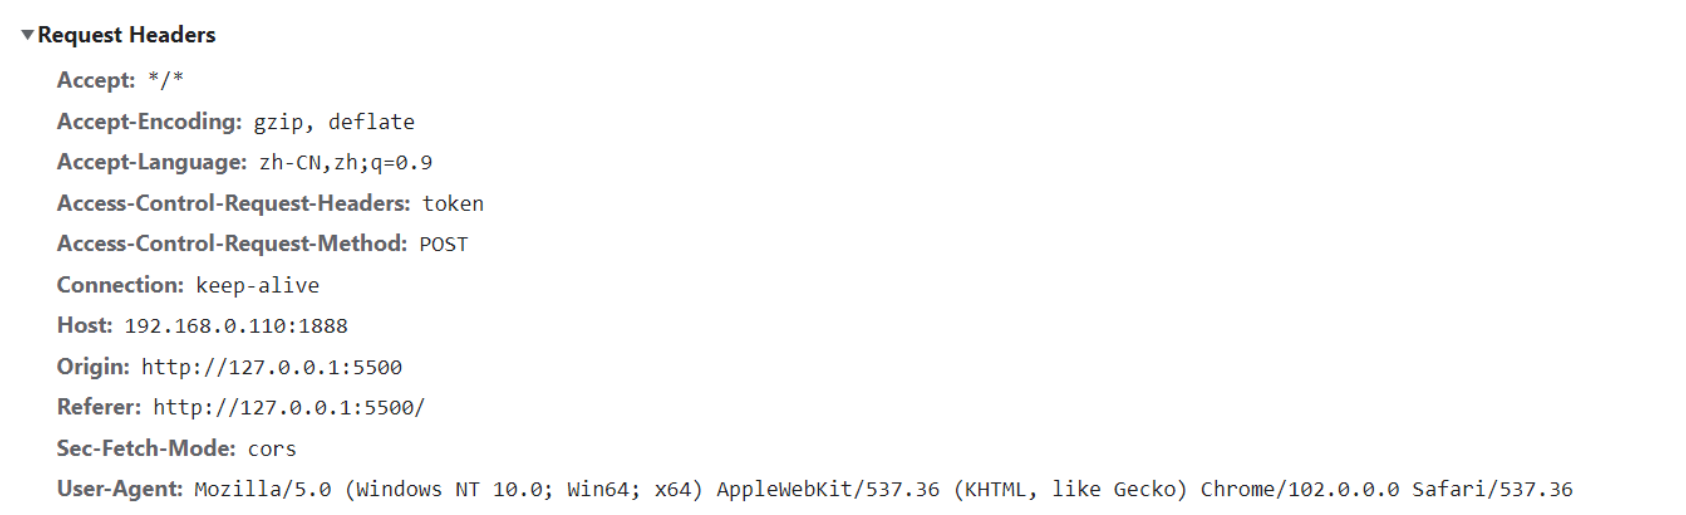
content-type是这次请求携带的数据的类型:(重要)
- application/x-www-form-urlencoded:表示数据被编码成以 '&' 分隔的键 - 值对,同时以 '=' 分隔键和值
- application/json:表示是一个json类型;
- text/plain:表示是文本类型;
- application/xml:表示是xml类型;
- multipart/form-data:表示是上传文件;
content-length:文件的大小长度
keep-alive:
- http是基于TCP协议的,但是通常在进行一次请求和响应结束后会立刻中断;
- 在http1.0中,如果想要继续保持连接:
- 浏览器需要在请求头中添加 connection: keep-alive;
- 服务器需要在响应头中添加 connection:keey-alive;
- 当客户端再次发请求时,就会使用同一个连接,直接一方中断连接;
- 在http1.1中,所有连接默认是 connection: keep-alive的;
- 不同的Web服务器会有不同的保持 keep-alive的时间;
- Node中默认是5s中;
accept-encoding:告知服务器,客户端支持的文件压缩格式,比如js文件可以使用gzip编码,对应 .gz文件;
accept:告知服务器,客户端可接受文件的格式类型;
user-agent:客户端相关的信息;
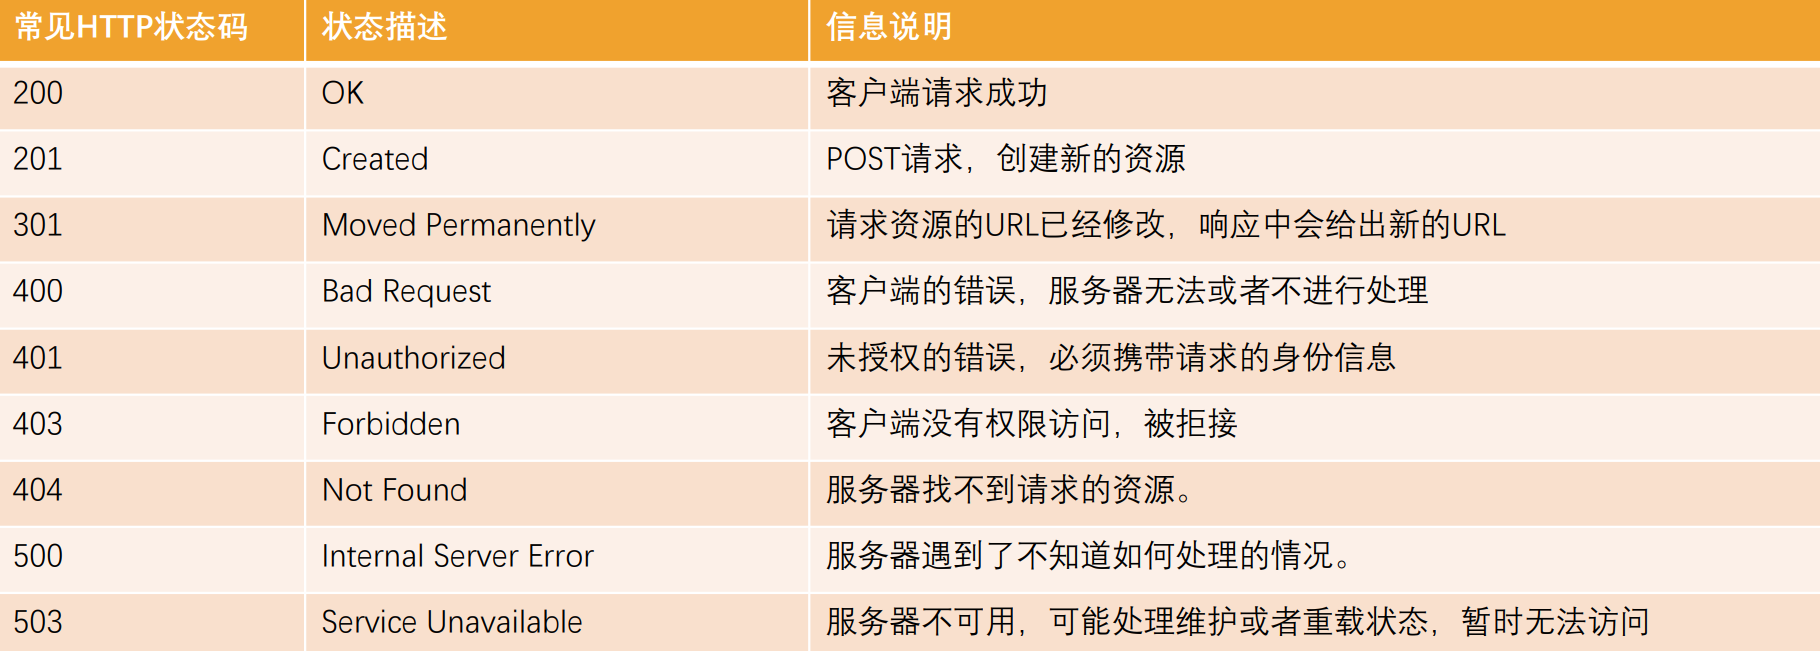
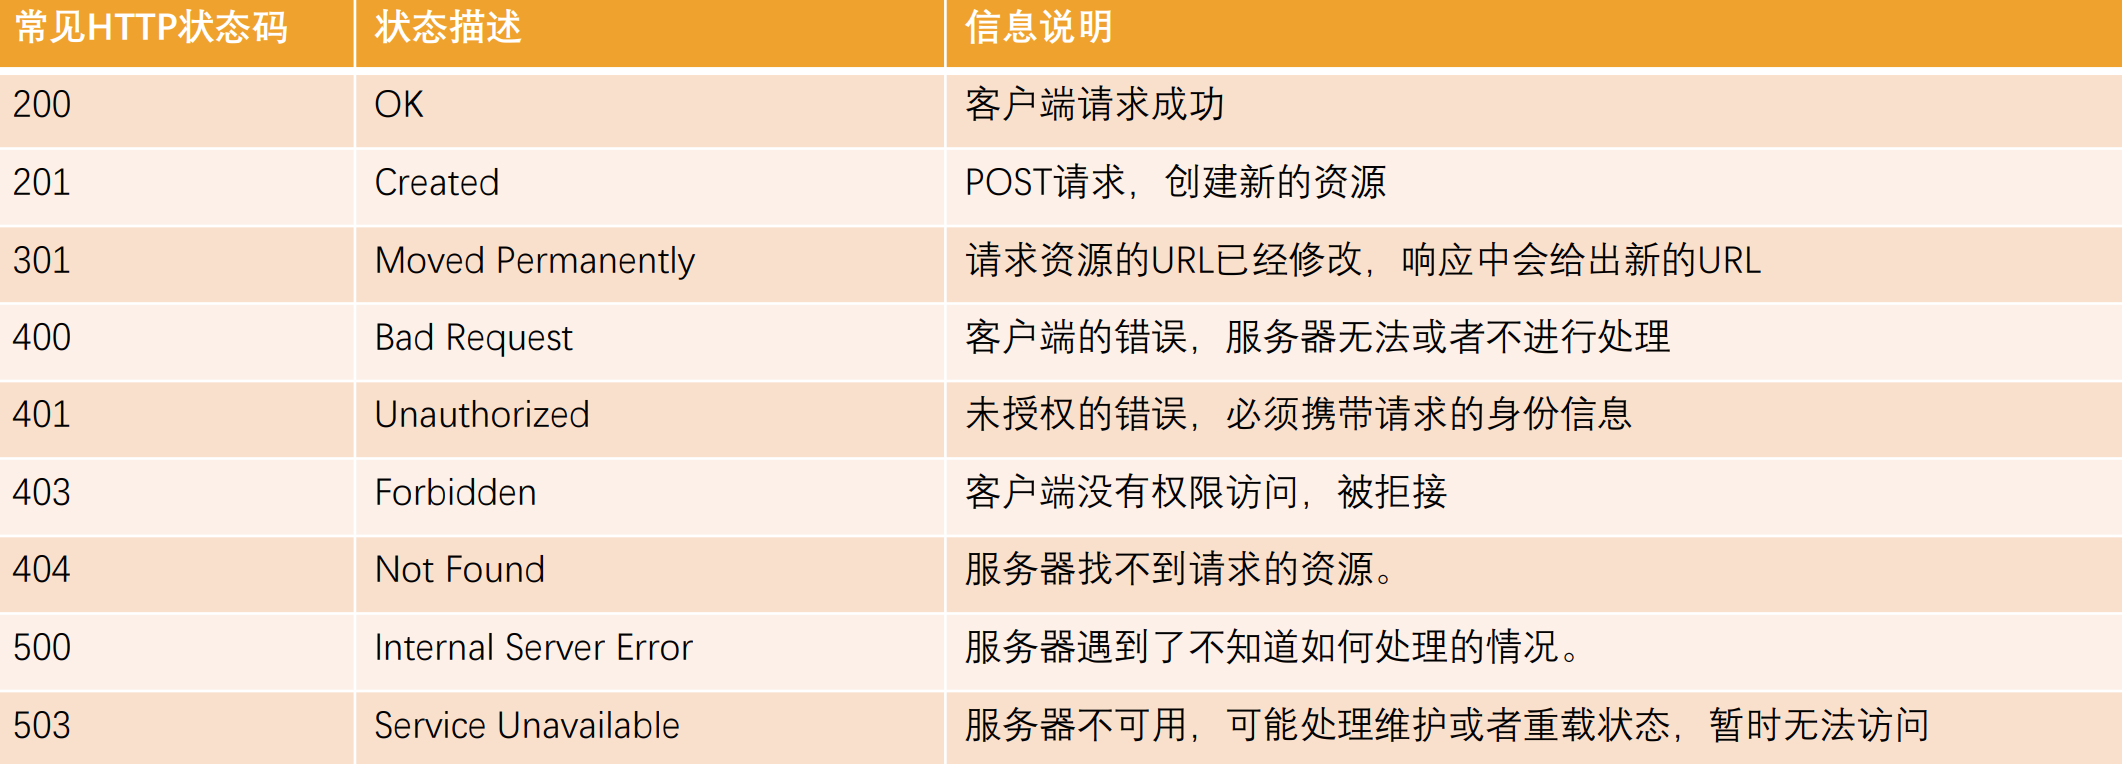
# 2.7.HTTP Response响应状态码
- Http状态码(Http Status Code)是用来表示Http响应状态的数字代码:
- Http状态码非常多,可以根据不同的情况,给客户端返回不同的状态码;
- MDN响应码解析地址:MDN响应码解析地址-查询 (opens new window)
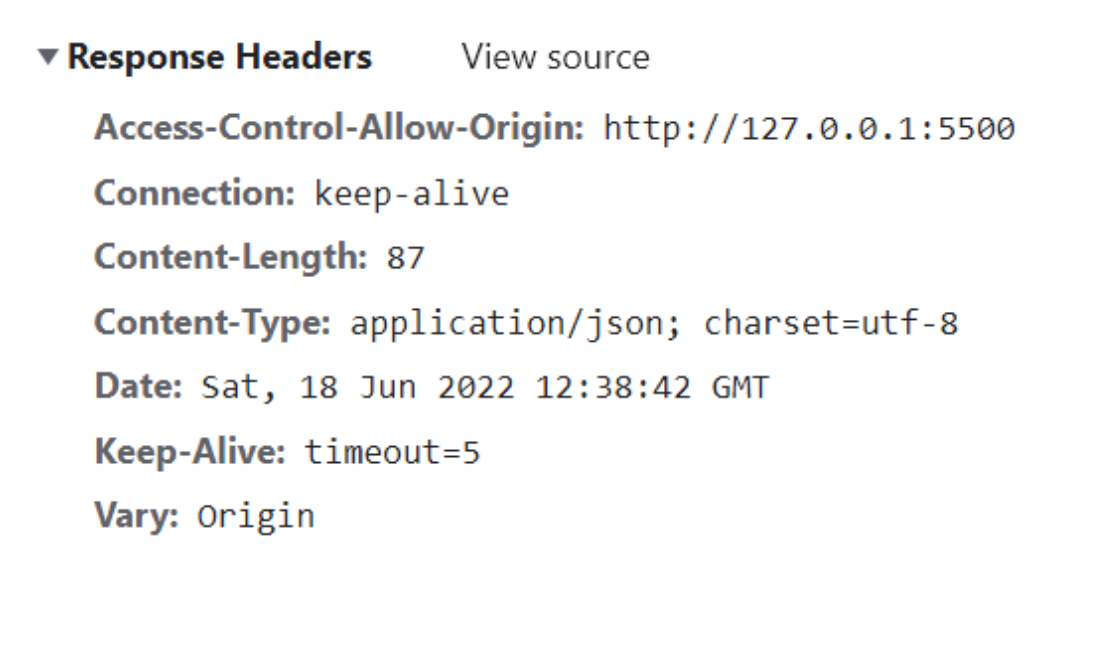
# 2.8.HTTP Request Header(响应头)
- 响应的header中包括一些服务器给客户端的信息:
# 3、Chrome安装插件 - FeHelper
- 为了之后查看数据更加的便捷、优雅,我们安装一个Chrome插件:
- 方式一:可以直接通过Chrome的扩展商店安装;
- 方式二:手动安装
- 下载地址:下载 (opens new window)

# 4、Ajax/XMLHttpRequest发送请求
# 4.1.AJAX发送请求
- AJAX 是异步的 JavaScript 和 XML(Asynchronous JavaScript And XML)
- XMLHttpRequest 是一个浏览器接口,使得Javascript可以进行HTTP (S)通信。 最早,微软在IE 5引进了这个接口。
- 它可以使用 JSON,XML,HTML 和 text 文本等格式发送和接收数据;
- 如何来完成AJAX请求呢?
- 第一步:创建网络请求的AJAX对象(使用XMLHttpRequest)
- 第二步:监听XMLHttpRequest对象状态的变化,或者监听onload事件(请求完成时触发);
- 第三步:配置网络请求(通过open方法);
- 第四步:发送send网络请求;
//1.创建XMLHttpReqest对象
const xhr = new XMLHttpRequest()
//2.监听对象状态的改变(宏任务)
xhr.onreadystatechange = function() {
  console.log('状态发生了改变',xhr.readyState)
}
//3.配置请求的方式URL
xhr.open('get','https://www.fastmock.site/mock/ae0babd1926b040dc68bd7b6fde5fbf1/shop/proinfo')
//4.发送请求
xhr.send()

console.log('first')
/**打印结果如下:
 * 状态发生了改变 1
 * first
 * 状态发生了改变 2
 * 状态发生了改变 3
 * 状态发生了改变 4
 */
1
2
3
4
5
6
7
8
9
10
11
12
13
14
15
16
17
18
19
2
3
4
5
6
7
8
9
10
11
12
13
14
15
16
17
18
19
# 4.2.XMLHttpRequest的state(状态)
- 事实上,我们在一次网络请求中看到状态发生了很多次变化,这是因为对于一次请求来说包括如下的状态
- 注意:这个状态并非是HTTP的相应状态,而是记录的XMLHttpRequest对象的状态变化。
- http响应状态通过status获取;
//1.创建XMLHttpReqest对象
const xhr = new XMLHttpRequest()
//2.监听对象状态的改变(宏任务)
xhr.onreadystatechange = function() {
  //如果状态不是DONE状态,直接返回
  //XMLHttpRequest.DONE是一个常量 为:4
  if(xhr.readyState !== XMLHttpRequest.DONE) return
  console.log('状态发生了改变',xhr.readyState)
}
//3.配置请求的方式URL
xhr.open('get','https://www.fastmock.site/mock/ae0babd1926b040dc68bd7b6fde5fbf1/shop/proinfo')
//4.发送请求
xhr.send()

console.log('first')
/**打印结果如下:
 * first
 * 状态发生了改变 4
 */
1
2
3
4
5
6
7
8
9
10
11
12
13
14
15
16
17
18
19
2
3
4
5
6
7
8
9
10
11
12
13
14
15
16
17
18
19
- 发送同步请求:
- 将open的第三个参数设置为false
//1.创建XMLHttpReqest对象
const xhr = new XMLHttpRequest()
//2.监听对象状态的改变(宏任务)
xhr.onreadystatechange = function() {
  console.log('状态发生了改变',xhr.readyState)
}
//3.配置请求的方式URL
xhr.open('get','https://www.fastmock.site/mock/ae0babd1926b040dc68bd7b6fde5fbf1/shop/proinfo',false)
//4.发送请求
xhr.send()

console.log('first')
/**打印结果如下:
 * 状态发生了改变 1
 * 状态发生了改变 4
 * first
 */
1
2
3
4
5
6
7
8
9
10
11
12
13
14
15
16
17
2
3
4
5
6
7
8
9
10
11
12
13
14
15
16
17
# 4.3.XMLHttpRequest其他事件监听
- 除了onreadystatechange还有其他的事件可以监听
- loadstart:请求开始。
- progress: 一个响应数据包到达,此时整个 response body 都在 response 中。
- abort:调用 xhr.abort() 取消了请求。
- error:发生连接错误,例如,域错误。不会发生诸如 404 这类的 HTTP 错误。
- load:请求成功完成。
- timeout:由于请求超时而取消了该请求(仅发生在设置了 timeout 的情况下)。
- loadend:在 load,error,timeout 或 abort 之后触发。
- 我们也可以使用load来获取数据:
//1.创建XMLHttpReqest对象
const xhr = new XMLHttpRequest()
//2.监听对象状态的改变(宏任务)
xhr.onreadystatechange = function() {
  if(xhr.readyState !== XMLHttpRequest.DONE) return
  console.log('状态发生了改变',xhr.readyState)
}
//3.配置请求的方式URL
xhr.open('get','https://www.fastmock.site/mock/ae0babd1926b040dc68bd7b6fde5fbf1/shop/proinfo')
//4.发送请求
xhr.send()

xhr.onload = function() {
  console.log(xhr.response)//请求到的数据
}
1
2
3
4
5
6
7
8
9
10
11
12
13
14
15
2
3
4
5
6
7
8
9
10
11
12
13
14
15
# 4.4.响应数据和响应类型
- 发送了请求后,我们需要获取对应的结果:response属性
- XMLHttpRequest response 属性返回响应的正文内容;、
- 返回的类型取决于responseType的属性设置;
- 通过responseType可以设置获取数据的类型
- 如果将 responseType 的值设置为空字符串,则会使用 text 作为默认值。
xhr.responseType = "json"
1
- 和responseText、responseXML的区别:
- 早期通常服务器返回的数据是普通的文本和XML,所以我们通常会通过responseText、 responseXML来获取响应结果;
- 之后将它们转化成JavaScript对象形式;
- 目前服务器基本返回的都是json数据,直接设置为json即可;
# 4.5.HTTP响应的状态status
- XMLHttpRequest的state是用于记录xhr对象本身的状态变化,并非针对于HTTP的网络请求状态。
- 如果我们希望获取HTTP响应的网络状态,可以通过status和statusText来获取
//1.创建XMLHttpReqest对象
const xhr = new XMLHttpRequest()
//2.监听对象状态的改变(宏任务)
xhr.onreadystatechange = function() {
  if(xhr.readyState !== XMLHttpRequest.DONE) return
  console.log('状态发生了改变',xhr.readyState)//状态发生了改变 4
  console.log(xhr.status,xhr.statusText)//200 OK
}
//3.配置请求的方式URL
xhr.open('get','https://www.fastmock.site/mock/ae0babd1926b040dc68bd7b6fde5fbf1/shop/proinfo')
//4.发送请求
xhr.send()

xhr.onload = function() {
  console.log(xhr.response)//请求到的数据
}
1
2
3
4
5
6
7
8
9
10
11
12
13
14
15
16
2
3
4
5
6
7
8
9
10
11
12
13
14
15
16
# 4.6.GET/POST请求传递参数
- 在开发中,我们使用最多的是GET和POST请求,在发送请求的过程中,我们也可以传递给服务器数据。
- 常见的传递给服务器数据的方式有如下几种:
- 方式一:GET请求的query参数
- 方式二:POST请求 x-www-form-urlencoded 格式
- 方式三:POST请求 FormData 格式
- 方式四:POST请求 JSON 格式
<!DOCTYPE html>
<html lang="en">
<head>
  <meta charset="UTF-8">
  <meta http-equiv="X-UA-Compatible" content="IE=edge">
  <meta name="viewport" content="width=device-width, initial-scale=1.0">
  <title>Document</title>
</head>
<body>

  <form class="info">
    <input name="name" value="coderwhy">
    <input name="age" value="18">
  </form>

  <script>

    const xhr = new XMLHttpRequest()

    xhr.onreadystatechange = function() {
      if (xhr.readyState !== XMLHttpRequest.DONE) return
      if (xhr.status >= 200 && xhr.status < 300 || xhr.status === 304) {
        console.log(xhr.response)
      } else {

      }
    }

    xhr.responseType = "json"

    // 1.get请求传递参数 -> 方式一:GET请求的query参数
    xhr.open("get", "http://192.168.0.110:1888/01_param/get?name=why&age=18")
    xhr.send()

    // 2.post请求传递参数(form) ->  方式三:POST请求 FormData 格式
    xhr.open("post", "http://192.168.0.110:1888/02_param/postform")
    const infoEl = document.querySelector(".info")
    const form = new FormData(infoEl)
    form.append("height", 1.88)
    xhr.send(form)

    // 3.post请求传递参数(json) -> POST请求 JSON 格式
    xhr.open("post", "http://192.168.0.110:1888/02_param/postjson")
    const jsonParam = JSON.stringify({name: "whycoder", age: 21})
    xhr.setRequestHeader('Content-type', 'application/json; charset=utf-8')
    xhr.send(jsonParam)

    // 4.post请求(urlencoded) -> POST请求 x-www-form-urlencoded 格式
    xhr.open("post", "http://192.168.0.110:1888/02_param/posturl")
    const urlParam = "name=why&age=18"
    xhr.setRequestHeader('Content-type', 'application/x-www-form-urlencoded')
    xhr.send(urlParam)

  </script>

</body>
</html>
1
2
3
4
5
6
7
8
9
10
11
12
13
14
15
16
17
18
19
20
21
22
23
24
25
26
27
28
29
30
31
32
33
34
35
36
37
38
39
40
41
42
43
44
45
46
47
48
49
50
51
52
53
54
55
56
57
58
2
3
4
5
6
7
8
9
10
11
12
13
14
15
16
17
18
19
20
21
22
23
24
25
26
27
28
29
30
31
32
33
34
35
36
37
38
39
40
41
42
43
44
45
46
47
48
49
50
51
52
53
54
55
56
57
58
# 4.7.ajax网络请求封装
function hyajax({
  url,
  method = "get",
  data = {},
  timeout = 5000,
  headers = {},
  success,
  failure
} = {}) {
  // 1.创建xhr对象
  const xhr = new XMLHttpRequest()
  xhr.onreadystatechange = function() {
    if (xhr.readyState !== XMLHttpRequest.DONE) return
    if (xhr.status >= 200 && xhr.status < 300 || xhr.status === 304) {
      success && success(xhr.response)
    } else {
      failure && failure(xhr.response)
    }
  }

  // 2.设置响应的类型
  xhr.responseType = "json"
  xhr.timeout = timeout

  // 3.发送请求
  const params = Object.keys(data).map(key => `${key}=${encodeURIComponent(data[key])}`)
  const paramsString = params.join("&")

  // 设置header
  if (method.toLowerCase() === "get") {
    xhr.open(method, url + "?" + paramsString)
    Object.keys(headers).forEach(headerKey => xhr.setRequestHeader(headerKey, headers[headerKey]))
    xhr.send()
  } else {
    xhr.open(method, url)
    xhr.setRequestHeader('Content-type', 'application/x-www-form-urlencoded')
    Object.keys(headers).forEach(headerKey => xhr.setRequestHeader(headerKey, headers[headerKey]))
    xhr.send(paramsString)
  }

  return xhr
}


// 发送网络请求
hyajax({
  url: "http://192.168.0.110:1888/02_param/posturl",
  method: "post",
  data: {
    name: "why",
    age: 18
  },
  headers: {
    token: "coderwhy"
  },
  success: function(res) {
    console.log("success:", res)
  }
})
1
2
3
4
5
6
7
8
9
10
11
12
13
14
15
16
17
18
19
20
21
22
23
24
25
26
27
28
29
30
31
32
33
34
35
36
37
38
39
40
41
42
43
44
45
46
47
48
49
50
51
52
53
54
55
56
57
58
59
2
3
4
5
6
7
8
9
10
11
12
13
14
15
16
17
18
19
20
21
22
23
24
25
26
27
28
29
30
31
32
33
34
35
36
37
38
39
40
41
42
43
44
45
46
47
48
49
50
51
52
53
54
55
56
57
58
59
# 4.8.延迟时间timeout和取消请求
- 在网络请求的过程中,为了避免过长的时间服务器无法返回数据,通常我们会为请求设置一个超时时间:timeout。
- 当达到超时时间后依然没有获取到数据,那么这个请求会自动被取消掉;
- 默认值为0,表示没有设置超时时间;
- 我们也可以通过abort方法强制取消请求;
<!DOCTYPE html>
<html lang="en">
<head>
  <meta charset="UTF-8">
  <meta http-equiv="X-UA-Compatible" content="IE=edge">
  <meta name="viewport" content="width=device-width, initial-scale=1.0">
  <title>Document</title>
</head>
<body>

  <button>发送请求</button>
  <button class="cancel">取消请求</button>

  <script src="./js/hyrequest.js"></script>
  <script>
    const xhr = hyajax({ // 用上面封装好的ajax
      url: "http://192.168.0.110:1888/01_basic/timeout",
      timeout: 10000,
      success: (res) => {
        console.log("success:", res)
      },
      failure: (err) => {
        console.log("error:", err)
      }
    })

    const cancelBtn = document.querySelector(".cancel")
    cancelBtn.onclick = function() {
      xhr.abort()
    }
  </script>

</body>
</html>
1
2
3
4
5
6
7
8
9
10
11
12
13
14
15
16
17
18
19
20
21
22
23
24
25
26
27
28
29
30
31
32
33
34
35
2
3
4
5
6
7
8
9
10
11
12
13
14
15
16
17
18
19
20
21
22
23
24
25
26
27
28
29
30
31
32
33
34
35
# 4.9.XMLHttpRequest文件上传
- 文件上传是开发中经常遇到的需求,比如头像上传、照片等。
- 要想真正理解文件上传,必须了解服务器如何处理上传的文件信息;
<!DOCTYPE html>
<html lang="en">
<head>
  <meta charset="UTF-8">
  <meta http-equiv="X-UA-Compatible" content="IE=edge">
  <meta name="viewport" content="width=device-width, initial-scale=1.0">
  <title>Document</title>
</head>
<body>

  <form class="fileform">
    <input class="file" type="file">
  </form>
  <button class="upload">上传</button>

  <script>
    const fileEl = document.querySelector(".file")
    const uploadBtn = document.querySelector(".upload")

    uploadBtn.onclick = function() {
      // 1.获取文件
      const files = fileEl.files
      if (!files.length) {
        alert("请选择要上传的文件")
        return
      }
      const avatarFile = files[0]
      const fileForm = new FormData()
      fileForm.append("avatar", avatarFile)

      // 2.开始上传
      const xhr = new XMLHttpRequest()
      xhr.upload.onprogress = function(event) {
        console.log(`${event.loaded}/${event.total}`)
      }
      xhr.onload = function() {
        console.log(xhr.response)
      }
      xhr.open("POST", "http://192.168.0.110:1888/02_param/upload")
      xhr.setRequestHeader("Content-Type", "multipart/form-data")
      xhr.send(fileForm)
    }
  </script>

</body>
</html>
1
2
3
4
5
6
7
8
9
10
11
12
13
14
15
16
17
18
19
20
21
22
23
24
25
26
27
28
29
30
31
32
33
34
35
36
37
38
39
40
41
42
43
44
45
46
47
2
3
4
5
6
7
8
9
10
11
12
13
14
15
16
17
18
19
20
21
22
23
24
25
26
27
28
29
30
31
32
33
34
35
36
37
38
39
40
41
42
43
44
45
46
47
# 5、Fetch发送网络请求
# 5.1.认识Fetch和Fetch API
Fetch可以看做是早期的XMLHttpRequest的替代方案,它提供了一种更加现代的处理方案:
- 比如返回值是一个Promise,提供了一种更加优雅的处理结果方式
- 在请求发送成功时,调用resolve回调then;
- 在请求发送失败时,调用reject回调catch;
- 比如不像XMLHttpRequest一样,所有的操作都在一个对象上;
- 比如返回值是一个Promise,提供了一种更加优雅的处理结果方式
fetch函数的使用:
Promise<Respinse> fetch(input[,init])input:定义要获取的资源地址,可以是一个URL字符串,也可以使用一个Request对象(实验性特性)类型;
init:其他初始化参数
- method: 请求使用的方法,如 GET、POST;
- headers: 请求的头信息;
- body: 请求的 body 信息;
fetch
1
# 5.2.Fetch数据的响应(Response)
- Fetch的数据响应主要分为两个阶段:
- 阶段一:当服务器返回了响应(response)
- fetch 返回的 promise 就使用内建的 Response class 对象来对响应头进行解析;
- 在这个阶段,我们可以通过检查响应头,来检查 HTTP 状态以确定请求是否成功;
- 如果 fetch 无法建立一个 HTTP 请求,例如网络问题,亦或是请求的网址不存在,那么 promise 就会 reject;
- 异常的 HTTP 状态,例如 404 或 500,不会导致出现 error;
- 我们可以在 response 的属性中看到 HTTP 状态:
- status:HTTP 状态码,例如 200;
- ok:布尔值,如果 HTTP 状态码为 200-299,则为 true;
- 第二阶段,为了获取 response body,我们需要使用一个其他的方法调用。
- response.text() —— 读取 response,并以文本形式返回 response;
- response.json() —— 将 response 解析为 JSON; ->返回的是一个promise
fetch("https://www.fastmock.site/mock/ae0babd1926b040dc68bd7b6fde5fbf1/shop/proinfo").then(res => {
  // return res.text()
  return res.json()
}).then(res => {
  console.log(res)
})
1
2
3
4
5
6
2
3
4
5
6
# 5.3.Fetch网络请求的演练
- 基于Promise的使用方案:
//1.发送fetch请求
fetch("https://www.fastmock.site/mock/ae0babd1926b040dc68bd7b6fde5fbf1/shop/proinfo").then(res => {
  // return res.text()
  return res.json()
}).then(res => {
  console.log(res)
})
1
2
3
4
5
6
7
2
3
4
5
6
7
- 基于async、await的使用方案:
async function getData() {
  const res = await fetch("https://www.fastmock.site/mock/ae0babd1926b040dc68bd7b6fde5fbf1/shop/proinfo")
  // console.log(res.json())//Promise {<pending>}
  const data = await res.json()
  console.log(data)
  // res.json().then(res => {
  //   console.log(res)
  // })
}
getData()
1
2
3
4
5
6
7
8
9
10
2
3
4
5
6
7
8
9
10
# 5.4.Fetch POST请求
- 创建一个 POST 请求,或者其他方法的请求,我们需要使用 fetch 选项:
- method:HTTP 方法,例如 POST,
- body:request body,其中之一:
- 字符串(例如 JSON 编码的),
- FormData 对象,以 multipart/form-data 形式发送数据,
async function getData() {
  const res = await fetch("https://192.168.8.101:1888/test", {
    method: 'post',
    headers: {
      "Cotent-Type": "application/x-www-form-urlencoded",
    },
    body:"name:kobe&age=39"
  })
  const data = await res.json()
  console.log(data)
}
getData()
1
2
3
4
5
6
7
8
9
10
11
12
2
3
4
5
6
7
8
9
10
11
12
async function getData() {
  const res = await fetch("https://www.fastmock.site/mock/2255035612ef720bb19e75aae3ad1d90/home/api/post_lyk?username=admin&password=123456", {
    method: 'post',
  })
  const data = await res.json()
  console.log(data.data.userInfo)
}
getData()
1
2
3
4
5
6
7
8
2
3
4
5
6
7
8
# 5.5.Fetch文件上传
<!DOCTYPE html>
<html lang="en">
<head>
  <meta charset="UTF-8">
  <meta http-equiv="X-UA-Compatible" content="IE=edge">
  <meta name="viewport" content="width=device-width, initial-scale=1.0">
  <title>Document</title>
</head>
<body>

  <form class="fileform">
    <input class="file" type="file">
  </form>
  <button class="upload">上传</button>

  <script>
    const fileEl = document.querySelector(".file")
    const uploadBtn = document.querySelector(".upload")
    uploadBtn.onclick = function() {
      // 1.获取文件
      const files = fileEl.files
      if (!files.length) {
        alert("请选择要上传的文件")
        return
      }
      const avatarFile = files[0]
      const fileForm = new FormData()
      fileForm.append("avatar", avatarFile)

      // 2.开始上传
      fetch("http://192.153.32.32:1888/02_param/upload", {
        method: "post",
        body: fileForm
      }).then(res => {
        return res.json()
      }).then(res => {
        console.log("res:", res)
      })
    }

  </script>

</body>
</html>
1
2
3
4
5
6
7
8
9
10
11
12
13
14
15
16
17
18
19
20
21
22
23
24
25
26
27
28
29
30
31
32
33
34
35
36
37
38
39
40
41
42
43
44
45
2
3
4
5
6
7
8
9
10
11
12
13
14
15
16
17
18
19
20
21
22
23
24
25
26
27
28
29
30
31
32
33
34
35
36
37
38
39
40
41
42
43
44
45
# 5.6.axios文件上传
<!DOCTYPE html>
<html lang="en">

<head>
  <meta charset="UTF-8">
  <meta http-equiv="X-UA-Compatible" content="IE=edge">
  <meta name="viewport" content="width=device-width, initial-scale=1.0">
  <title>Document</title>
</head>

<body>
  <form class="fileform">
    <input class="file" type="file">
  </form>
  <button class="upload">上传</button>
  <script src="https://unpkg.com/axios/dist/axios.min.js"></script>
  <script>
    const fileEl = document.querySelector(".file")
    const uploadBtn = document.querySelector(".upload")

    uploadBtn.onclick = function () {
      // 1.获取文件
      const files = fileEl.files
      if (!files.length) {
        alert("请选择要上传的文件")
        return
      }
      const avatarFile = files[0]
      const fileForm = new FormData()
      fileForm.append("avatar", avatarFile)
      axios.post("http://192.153.32.32:1888/02_param/upload", fileForm).then(res => {
        console.log(res)
      })
    }
  </script>
</body>

</html>
1
2
3
4
5
6
7
8
9
10
11
12
13
14
15
16
17
18
19
20
21
22
23
24
25
26
27
28
29
30
31
32
33
34
35
36
37
38
2
3
4
5
6
7
8
9
10
11
12
13
14
15
16
17
18
19
20
21
22
23
24
25
26
27
28
29
30
31
32
33
34
35
36
37
38